Advanced Statistical Programming using R

Week 4: Version Control & Collaborative Coding

2026-05-07

Announcements

Reminders

  1. Check the updated schedule: https://soda-lmu.github.io/StatProg2-2026-SoSe/#schedule
  2. Commit into your individual git reflection logs
  3. Group formation this week — talk to each other, sign up on Moodle

Group formation activity

  • If you are already in a group, please register via Moodle
  • If not, please stay at the end of class, or answer the matchmaking form on Moodle.

Examination Format

Date is now July 29 Jul 30.

Oral exam will:

  • assess your statistical programming, collaboration and communication skills
  • assess your judgement and reasoning:
    • explain decisions,
    • defend choices,
    • and reason about alternative options
  • based on group project and individual practical exercises

More details to be provided closer to the examination date.

Group Project

Learning goals

:In the hands-on project, you will:

  • practice strategies for learning from data
  • implement statistical programming tasks
  • discuss and negotiate key decisions in data science workflows
  • produce a data-driven report, story, dashboard or other final output
  • leverage LLMs for assistance with statistical reasoning and programming
  • practice collaborative coding skills

Dataset requirements

Your dataset:

  • should contain data available under an open licence
  • must have variation across at least two dimensions (e.g. time and space, or group and time)
  • may contain more than one data table (e.g. like nycflights13)
  • every data table should have an identification variable (you may create one) that uniquely identifies each observation
  • be no larger than 10 MB (as raw csv files)

At least one data table should contain:

  • > 50 rows,
  • one numeric outcome variable y (not binary 0/1),
  • two explanatory variables:
    • one numeric variable: x_1 (can be time)
    • one categorical variable: x_2

Dataset Ideas

Tip

Keep a log of data sources you explore! Even datasets you don’t use can be valuable discussion examples in the Oral Exam.

Syllabus

Part 1: Statistical Programming Foundations (W2–6)

  • W02: Scripts, Functions & Refactoring
  • W03: Debugging
  • W04: Version Control & Remotes Collaborative Coding`
  • W05: Quarto websites & Collaborative Coding
  • W06: R Packages

Last Week

  • Responsible AI usage & LLM management
  • Asking for help & writing good questions
  • Debugging tools and strategies

Errors & Troubleshooting

Three condition types

Type What to do
🚨 Error Must fix
⚠️ Warning Inspect output
💬 Message Read it

Troubleshooting steps

  1. Read the message
  2. Search the message
  3. Divide and conquer
  4. Read the docs
  5. Restart R

Minimal Reproducible Examples

Minimal

  • Remove unrelated code
  • Limit package dependencies
  • Use built-in datasets or synthetic data

Reproducible

  • Include library() calls
  • Use dput() for real data
  • Set set.seed() if randomness is involved

Tip

Writing a reprex often finds the bug for you — making code self-contained reveals missing library() calls or stale variables.

Debugging Tools

Goal Tool
Locate where error occurred traceback(), rlang::last_trace()
Pause and inspect inside function browser()
Debug a package function debugonce(fn), debug(fn)
Debug outside R (YAML, paths) quarto render in terminal

This Week

  • Git history
  • Git Ignore
  • Git Remotes & GitHub

Git Review

Motivation, commands so far, and how git works

Why version control?

The file naming trap

analysis_final.R
analysis_final_v2.R
analysis_FINAL_submit.R
analysis_FINAL_submit_fixed.R
analysis_use_this_one.R

The “what did I change?” problem

  • You get a result. Two days later it’s different.
  • Which script produced the submitted output?
  • Did you change the cleaning step or the model?
  • What did your collaborator edit last night?

Tip

Version control replaces both problems with one system: a named, timestamped history of every change.

What version control gives you

For your own work

  • A complete, browsable history of every change
  • Roll back any file to any past state
  • Confidence to experiment — you can always undo
  • A record of why you made each change (commit messages)

For collaboration

  • See exactly what a collaborator changed, line by line
  • Merge two people’s edits without overwriting each other
  • Review and discuss changes before they go into the project
  • Reproduce any past result from the exact code that produced it

Git Workflow

working directory  →  staging area  →  repository
   (your files)       (git add)        (git commit)
  1. Edit files as normal
  2. Stage the changes you want to keep (git add)
  3. Commit a named snapshot (git commit)

Commands so far

Set up & inspect

git init               # start tracking a folder
git status             # what has changed?
git log                # history of commits

Stage & commit

git add <file>         # stage a file
git add .              # stage all changes
git commit -m "msg"    # save a snapshot

What makes a good commit message?

  • Short imperative summary (≤ 50 chars)
  • Describes what and why, not how
  • Each commit captures one logical change
# ✓ good
git commit -m "Add penguin species filter"

# ✗ less helpful
git commit -m "fix"
git commit -m "changes"

Git History

Examples based on:

Going back through the log

  • So far, we’ve just used Git as a diary or journal to log additions.
  • What if we want to look back through past versions of our repository? or restore a past version of a file?
  • Let’s start by looking at what RStudio lets us do.

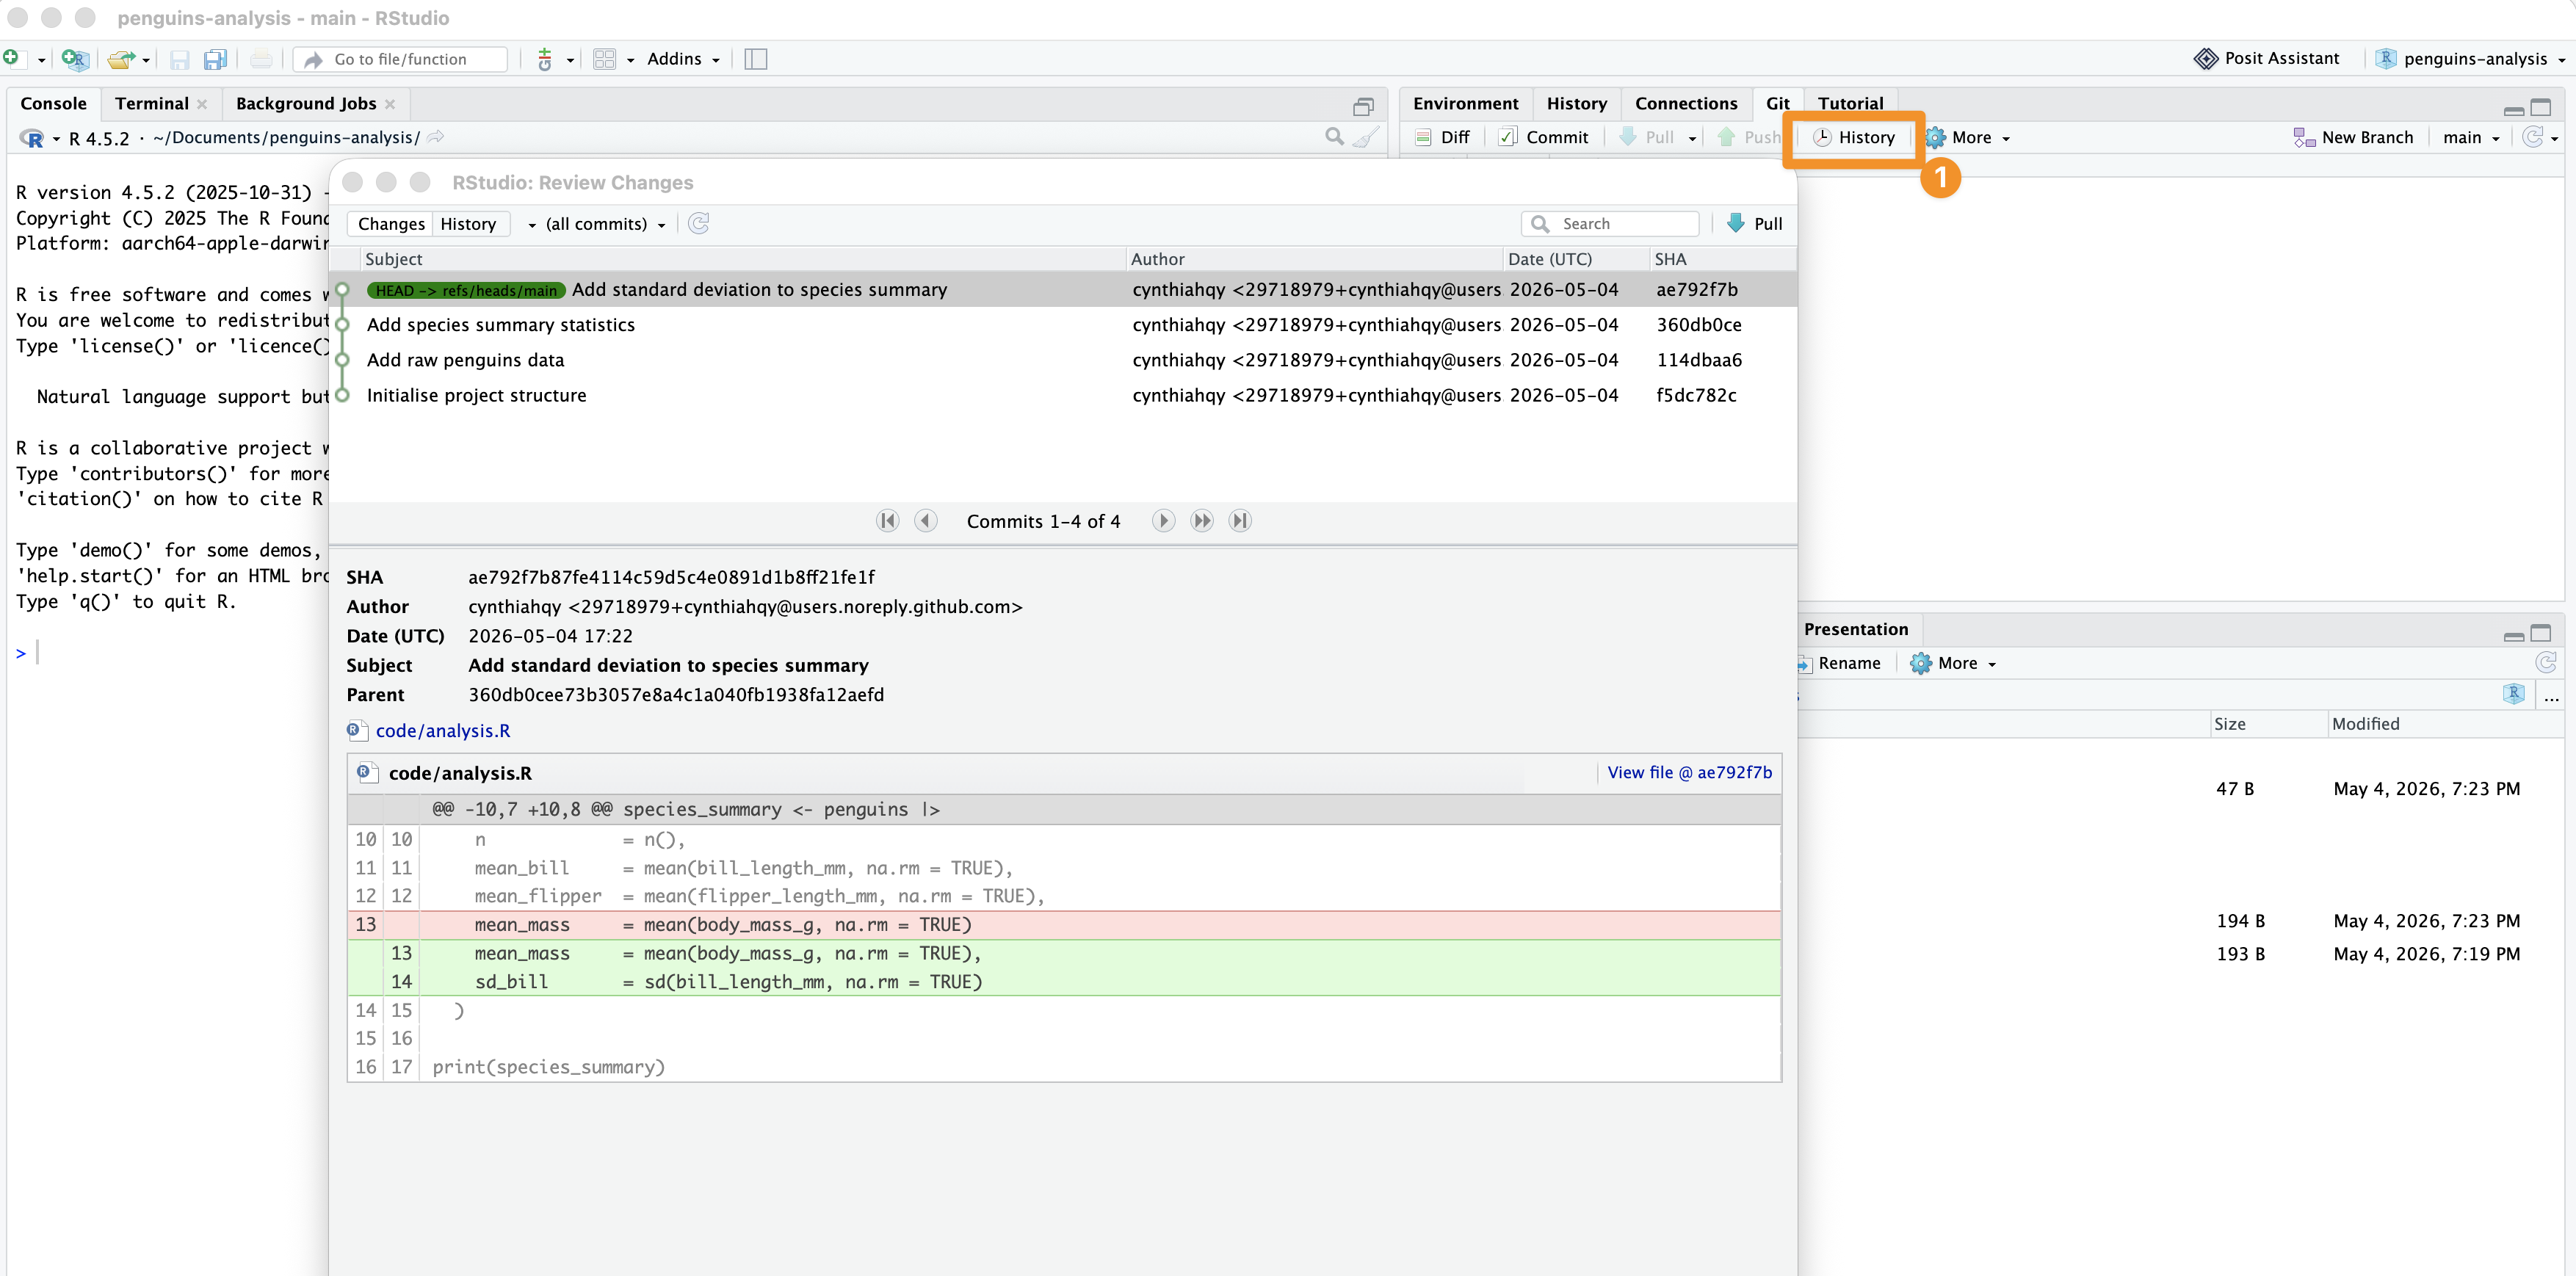
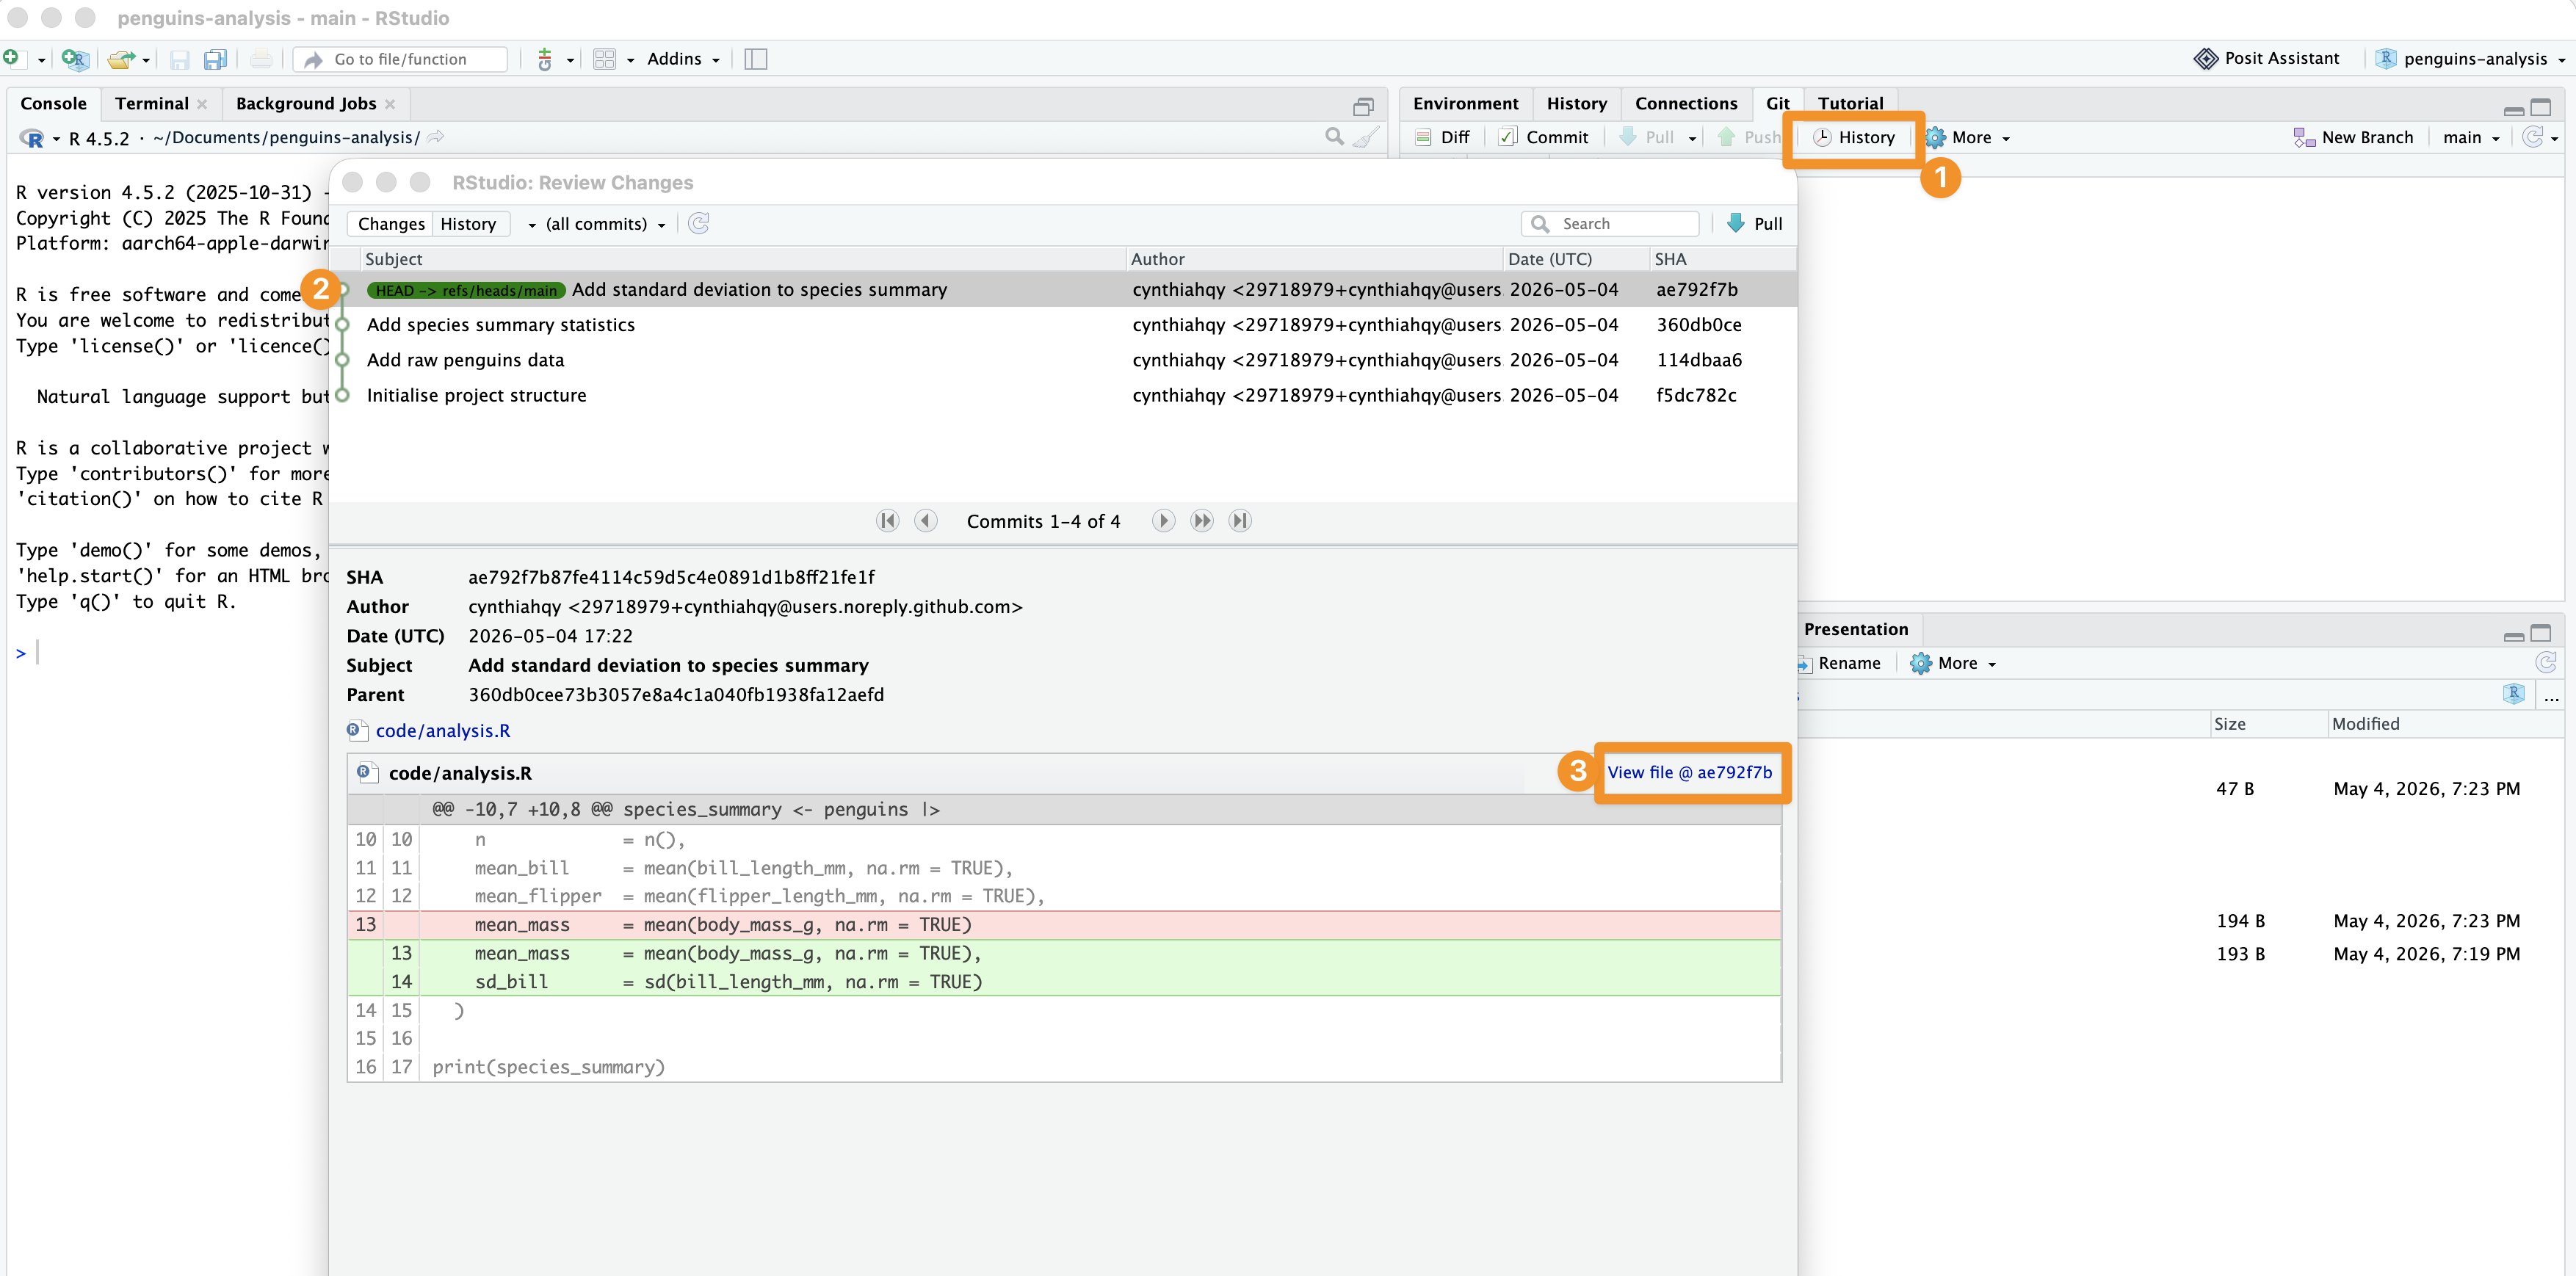
In RStudio: view log

Tip

The RStudio Git History panel calls git log under the hood — you can also run git log --oneline in the terminal for a compact view.

In RStudio: see changes
Tip

Changes are shown as highlights: red for deletions and green for additions

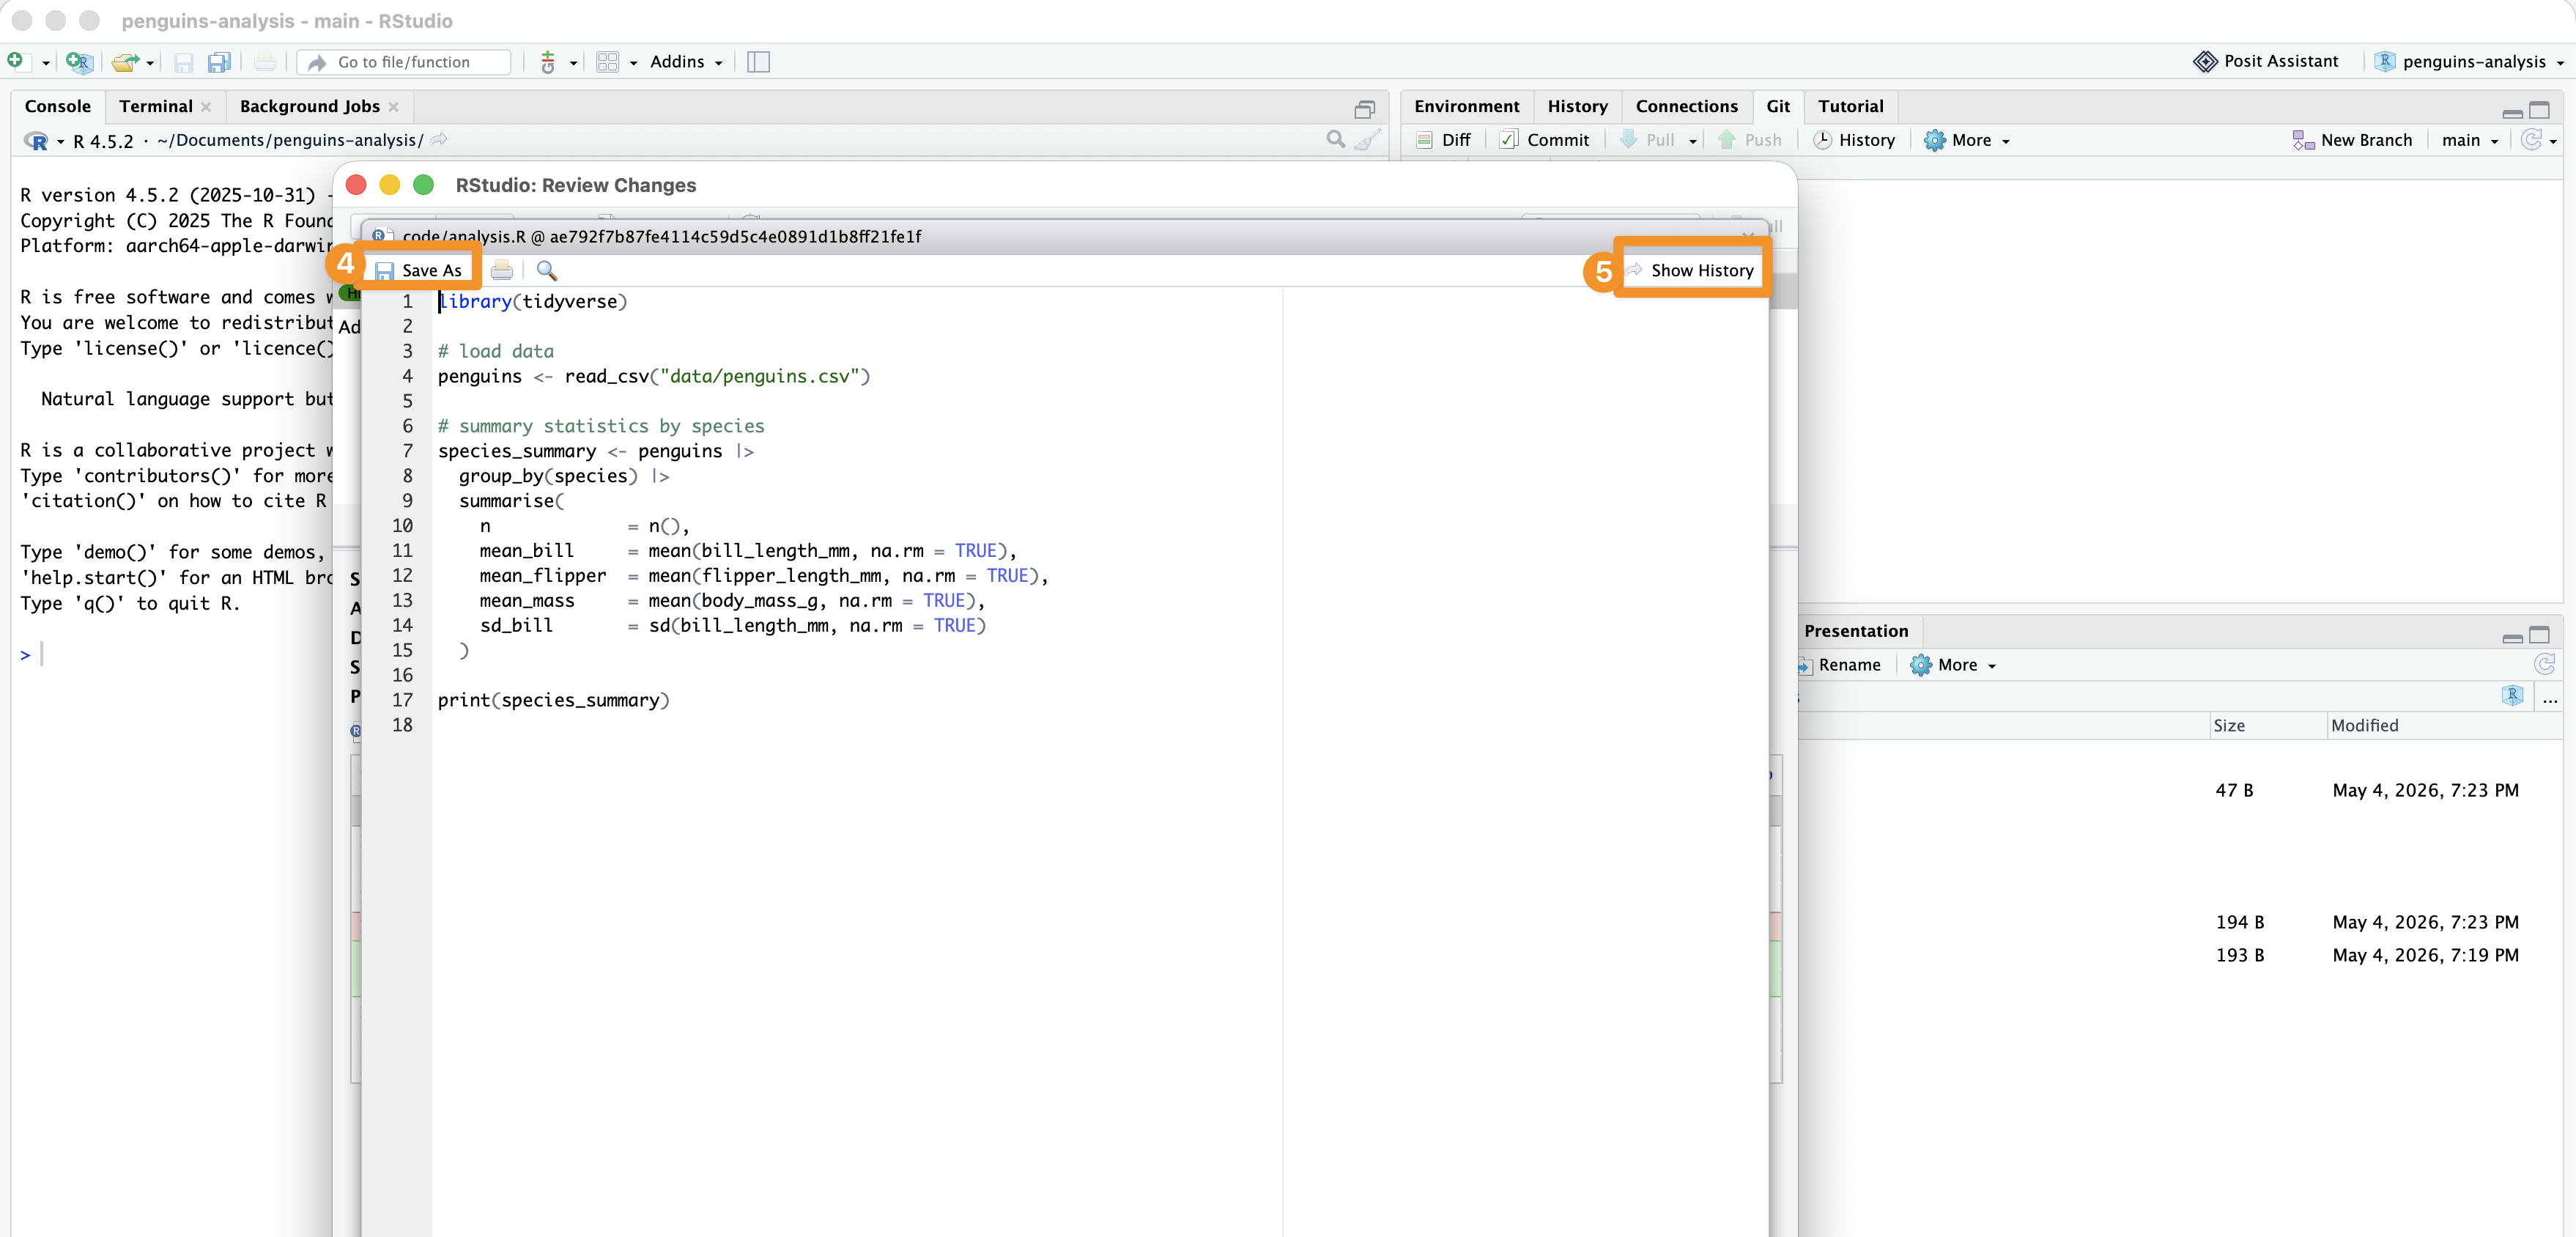
In RStudio: save past versions
Tip

Rstudio is displaying the results of: `git checkout – path/to/file.R``

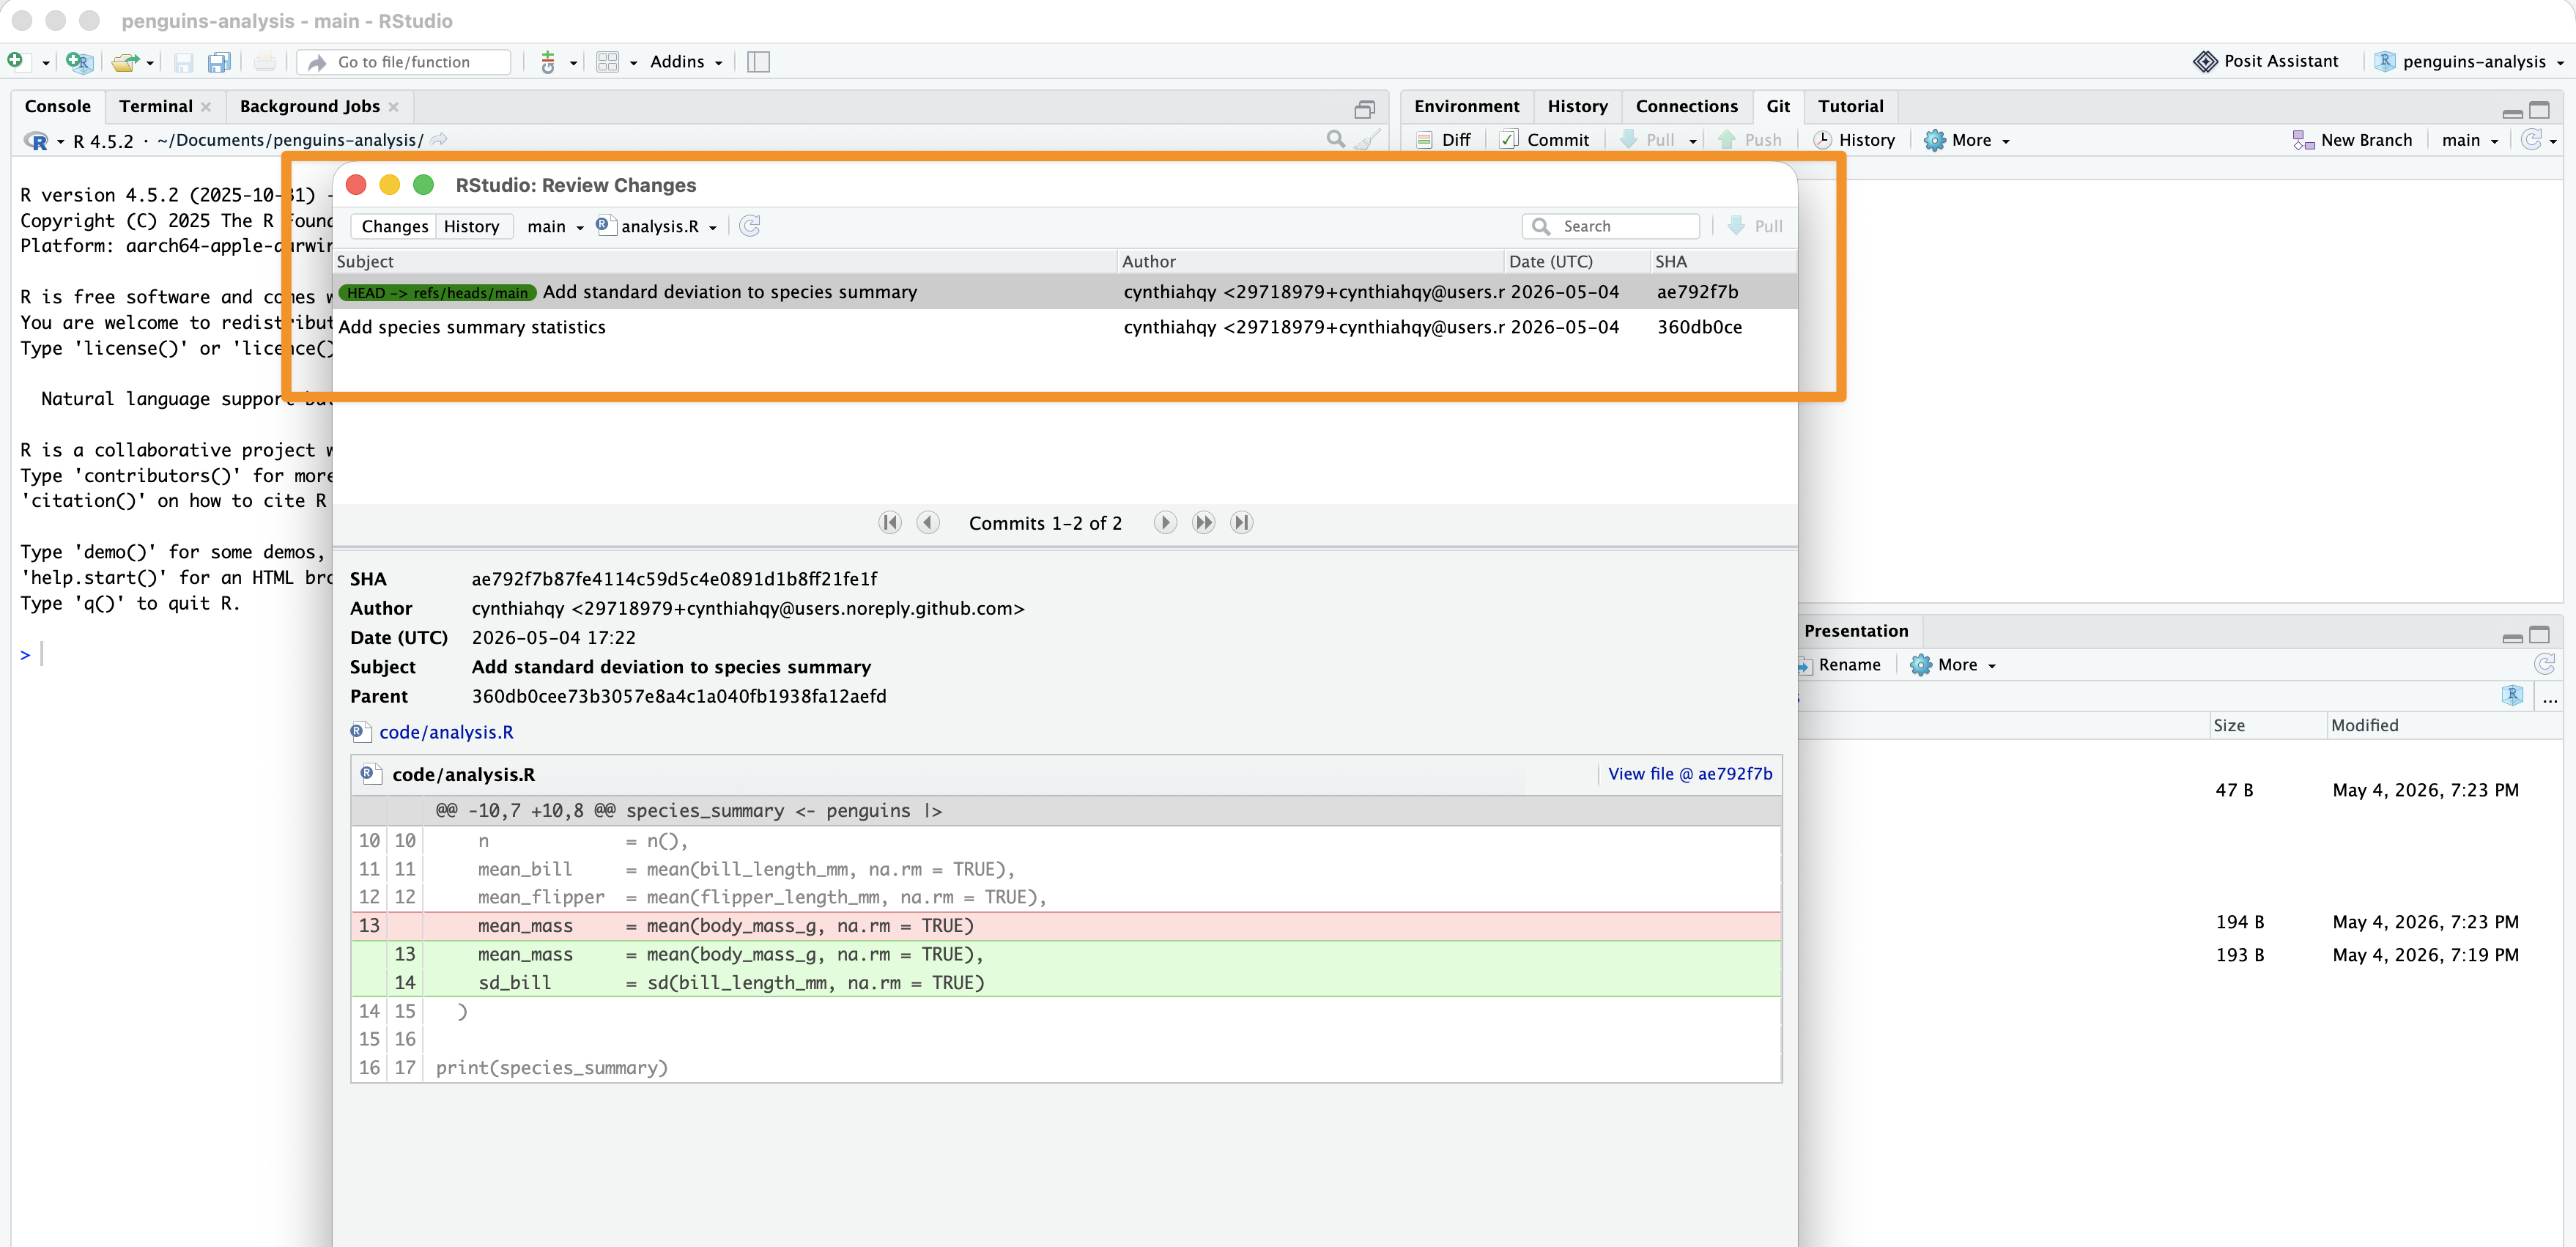
In RStudio: view file history

CLI: history commands

Browse the log

git log                      # full log
git log --oneline            # compact one-line view
git log --oneline --graph    # with branch graph
git log -- code/analysis.R  # commits touching one file

Inspect a specific commit

git show <hash>              # full diff for that commit
git show <hash>:code/analysis.R  # file as it was then

CLI: Restore removed files

Imagine you have commits A → B → C → D, where B removes a file. At D, you want to recover the missing files.

1. Checkout and stage the old file.

# bring a file back to how it was at <hash>
git checkout <hash> -- code/analysis.R

gitGraph:
  commit id: "A"
  commit id: "B: remove code/analysis.R"
  commit id: "C"
  commit id: "D (HEAD)"
  commit id: "git checkout A code/analysis.R"  type: HIGHLIGHT
  commit id: "E: add analysis back"

Staged — still need git commit, or you can un-stage the file (e.g. for more editing) with git restore --staged <file>

2. Apply patch to working directory

git diff <hash-2> <hash-1> | git apply

gitGraph:
  commit id: "A"
  commit id: "B: remove code/analysis.R"
  commit id: "C"
  commit id: "D (HEAD)"
  commit id: "git diff B A | git apply" type: HIGHLIGHT
  commit id: "E: add analysis back"

Unstaged — still need git add + git commit

CLI: Restore removed files

3. Revert the offending commit`

git revert <hash>

gitGraph:
  commit id: "A"
  commit id: "B: remove code/analysis.R" type: REVERSE
  commit id: "C"
  commit id: "D (HEAD)"
  commit id: "git revert B" type: HIGHLIGHT
  commit id: "E: add analysis back"

Auto-commits — done!

If we use the ‘Save As’ button in RStudio to restore the file, which option are we in?

  • 1: git diff <B> <A>| git apply
  • 2: git checkout <A> -- <file>
  • 3: git revert <B>

Git Ignore

What should NOT go in git?

Too large or auto-generated

  • raw data files > a few MB
  • rendered outputs (_site/, docs/)
  • compiled artefacts (.o, .so)

Machine-specific or sensitive

  • .Rhistory, .RData, .Rproj.user/
  • .DS_Store (macOS), Thumbs.db (Windows)
  • credentials, API keys, .env files
  • absolute paths baked into outputs

Warning

Once a file is committed, its content lives in git history — even if you delete it later. Never commit secrets.

.gitignore — project level

A .gitignore file at the repo root tells git which files and folders to skip.

Syntax

# ignore a specific file
.RData

# ignore all files with this extension
*.csv

# ignore a whole folder
_site/

# but track one file inside it
!_site/CNAME

Typical R / Quarto .gitignore

# R session artefacts
.Rhistory
.RData
.Rproj.user/

# Quarto build output
/_site/
/.quarto/

# OS noise
.DS_Store
Thumbs.db

Tip

GitHub offers a ready-made R .gitignore when you create a new repo — always tick that box.

Global .gitignore — machine level

Some files you want to ignore everywhere, not just in one project.

# create (or edit) your global ignore file
git config --global core.excludesFile ~/.gitignore_global

Add OS and editor noise once, never think about it again:

# macOS
.DS_Store
.AppleDouble

# Windows
Thumbs.db
Desktop.ini

# RStudio
.Rproj.user/

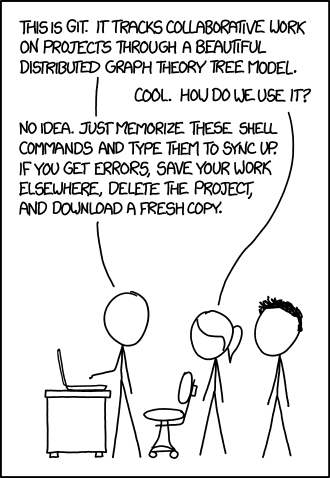
ASIDE: How does git actually work?

ASIDE: How does git actually work?

Git stores snapshots, not diffs.

Each commit records:

  • a snapshot of all tracked files
  • a pointer to the parent commit
  • your name, email, timestamp, and message
commit c3d4e5f
parent b2c3d4e
author Cynthia Huang
date   2026-05-07

Add penguin species filter
    ↓
[snapshot of all files]

You don’t need to know how git works under the hood for this unit, but if you are curious:

Git Remotes

Beyond your computer

So far, everything has lived on your machine:

working directory  →  staging area  →  local repository
   (your files)       (git add)        (git commit)

What if you want to share your work with others? or work on multiple machines?

A remote repository is a related repository hosted on a server:

working directory  →  staging area  →  local repo  →  remote repo
   (your files)       (git add)        (git commit)    (git push)
                                            ↑
                                        (git pull)
  • Need to use Git commands to compare and sync commits between remote & local

GitHub as remote server

  • GitHub is an interface and cloud hosting service built on top of the Git version control system.
  • Git does the version control and Github stores the data remotely.
  • Makes your work accessible to others (and to yourself on other machines)
  • Adds collaboration tools: issues, pull requests, code review

Tip

GitLab works the same way and is permitted in this course, but practicals and instructions will use GitHub.

GitHub: Connecting local and remote?

  • Set up a GitHub account
  • Authenticate
  • Connect to existing repo
  • Pull & Push local changes

Setup & Authentication

You need a GitHub account

Authentication = proving you are who you say you are

GitHub needs to verify your identity before you can connect:

  • HTTPS + PAT — a token you paste like a password
  • SSH key — a cryptographic key pair on your machine

Tip

We recommend using SSH using these instructions from LMU OSC. The full setup walkthrough is in this week’s practical.

From GitHub to your machine

A fork is your own copy of someone else’s repository — on GitHub’s servers.

original repo          your fork
(soda-lmu/template) → (you/template)
       ↓
  your machine  (git clone)

Changes you make stay in your fork until you open a Pull Request to propose them back.

A clone is a local copy of a GitHub repository — on your machine.

   GitHub repo
(you/template)
       ↓
  your machine  (git clone)

Changes you make stay local until you git push them back to GitHub.

Fork vs Clone

Fork Clone
Lives on GitHub your machine
Connected to original repo a GitHub repo
Used for contributing to others’ work working locally

Tip

For the group project: one member forks the template, the rest clone the fork. Everyone pushes to the same shared fork.

Fork an existing repository

Navigate first to the repository you want to fork – e.g.:

🔗 github.com/soda-lmu/our-statprog2-project
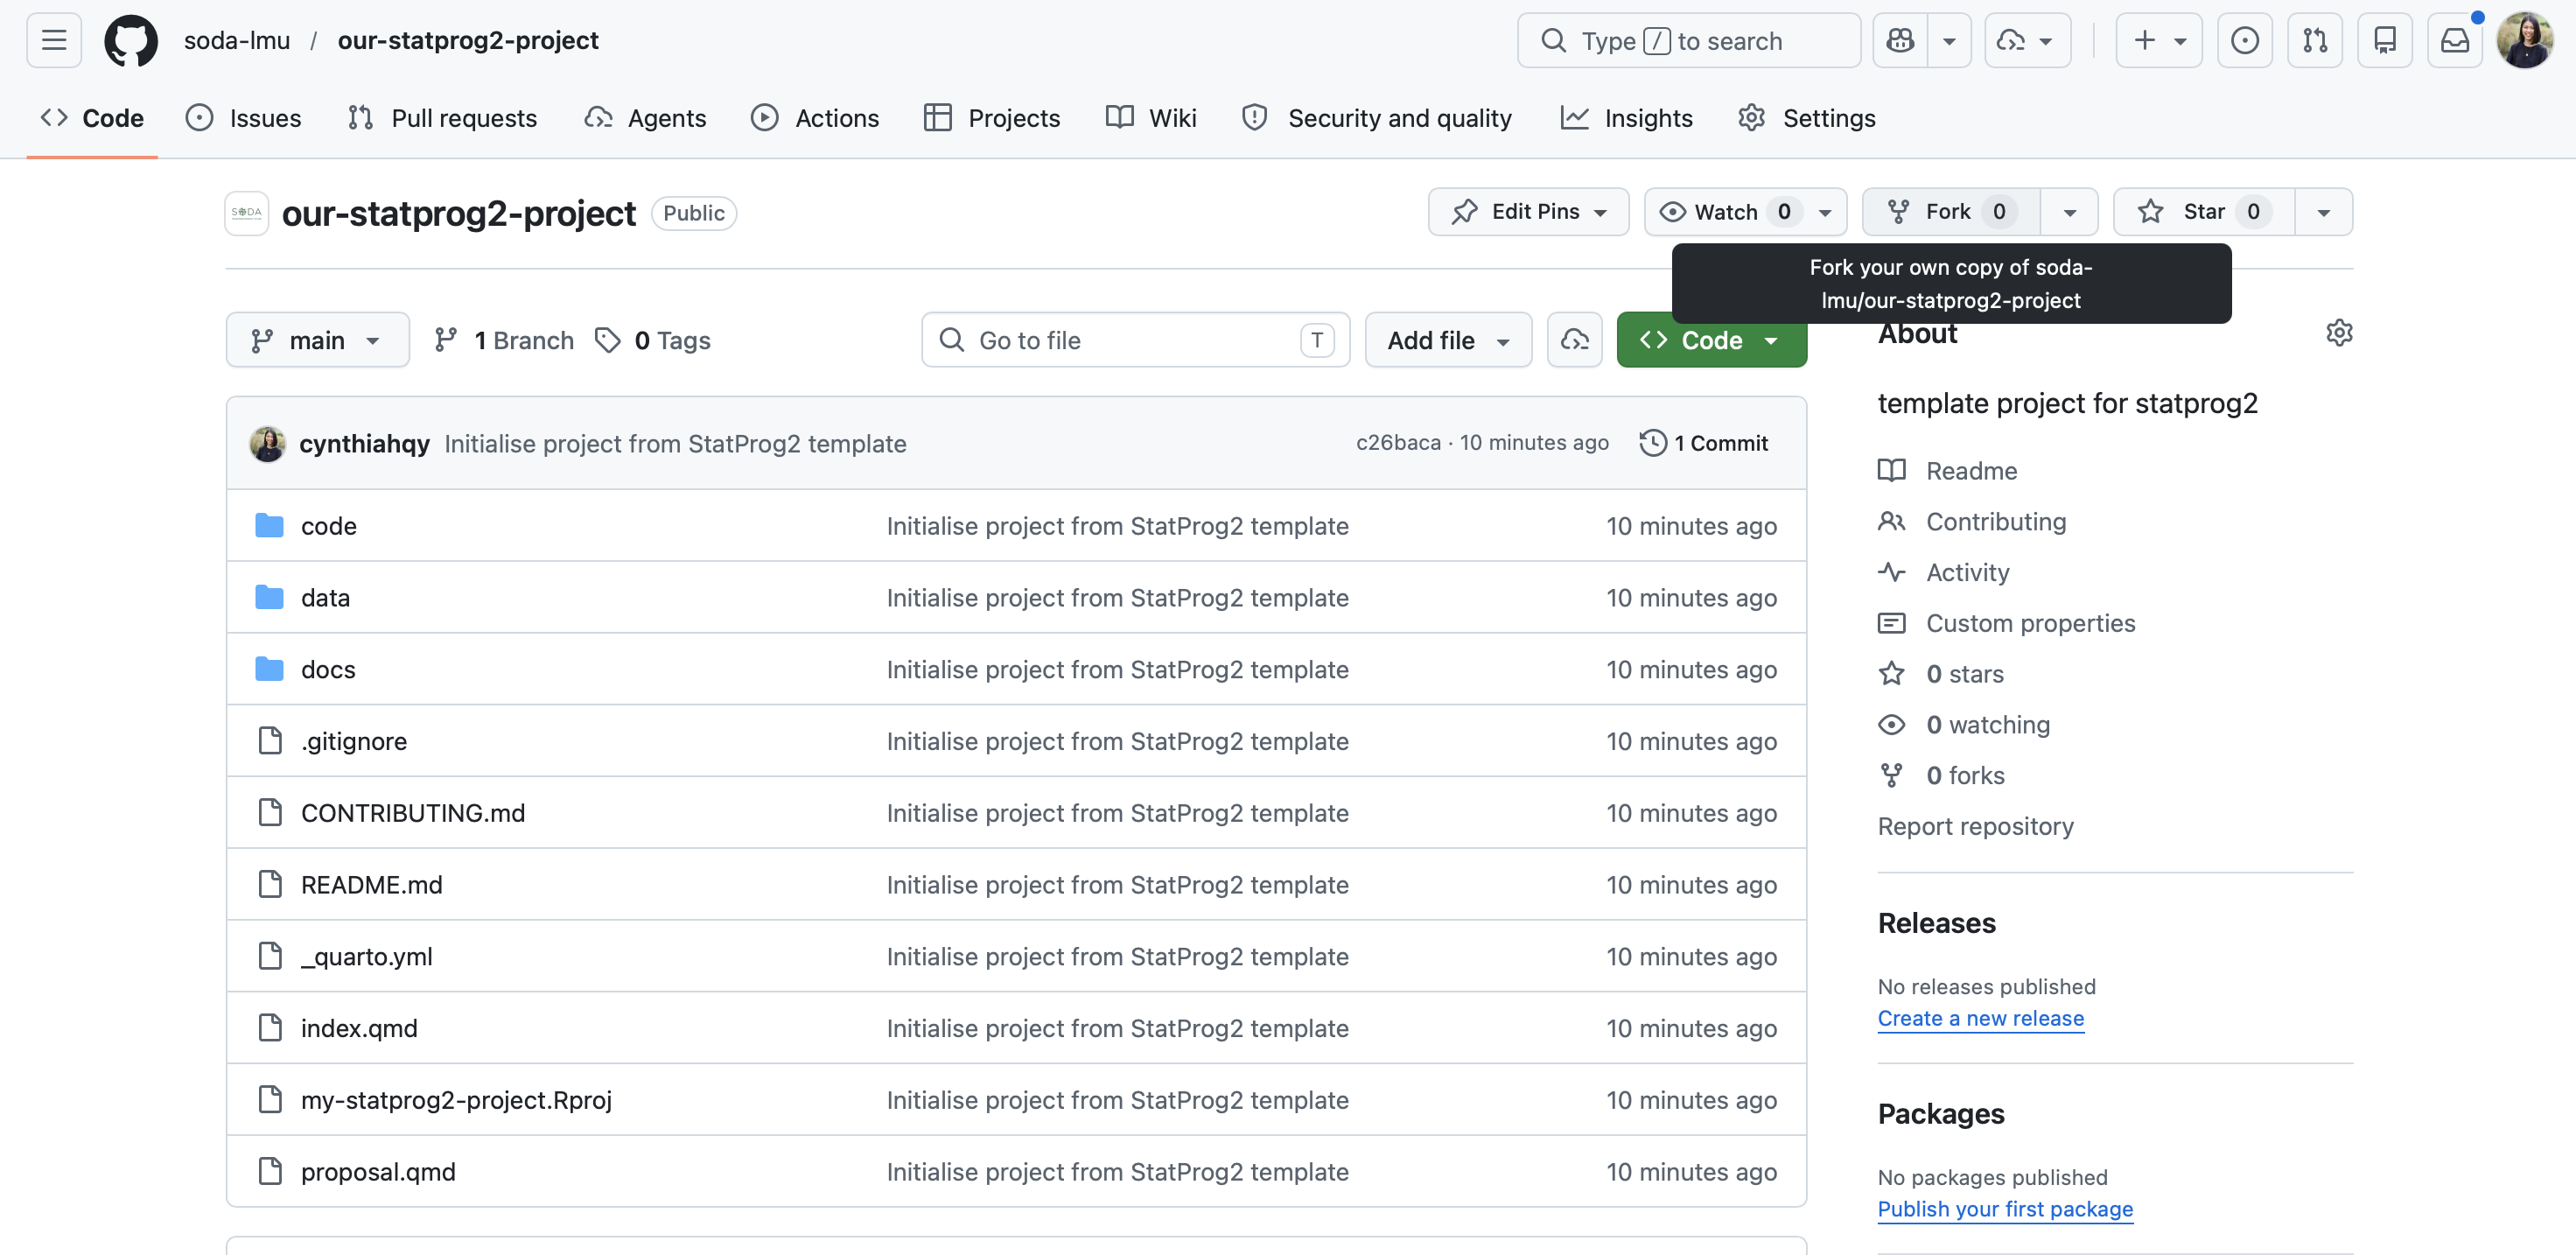
Fork an existing repository
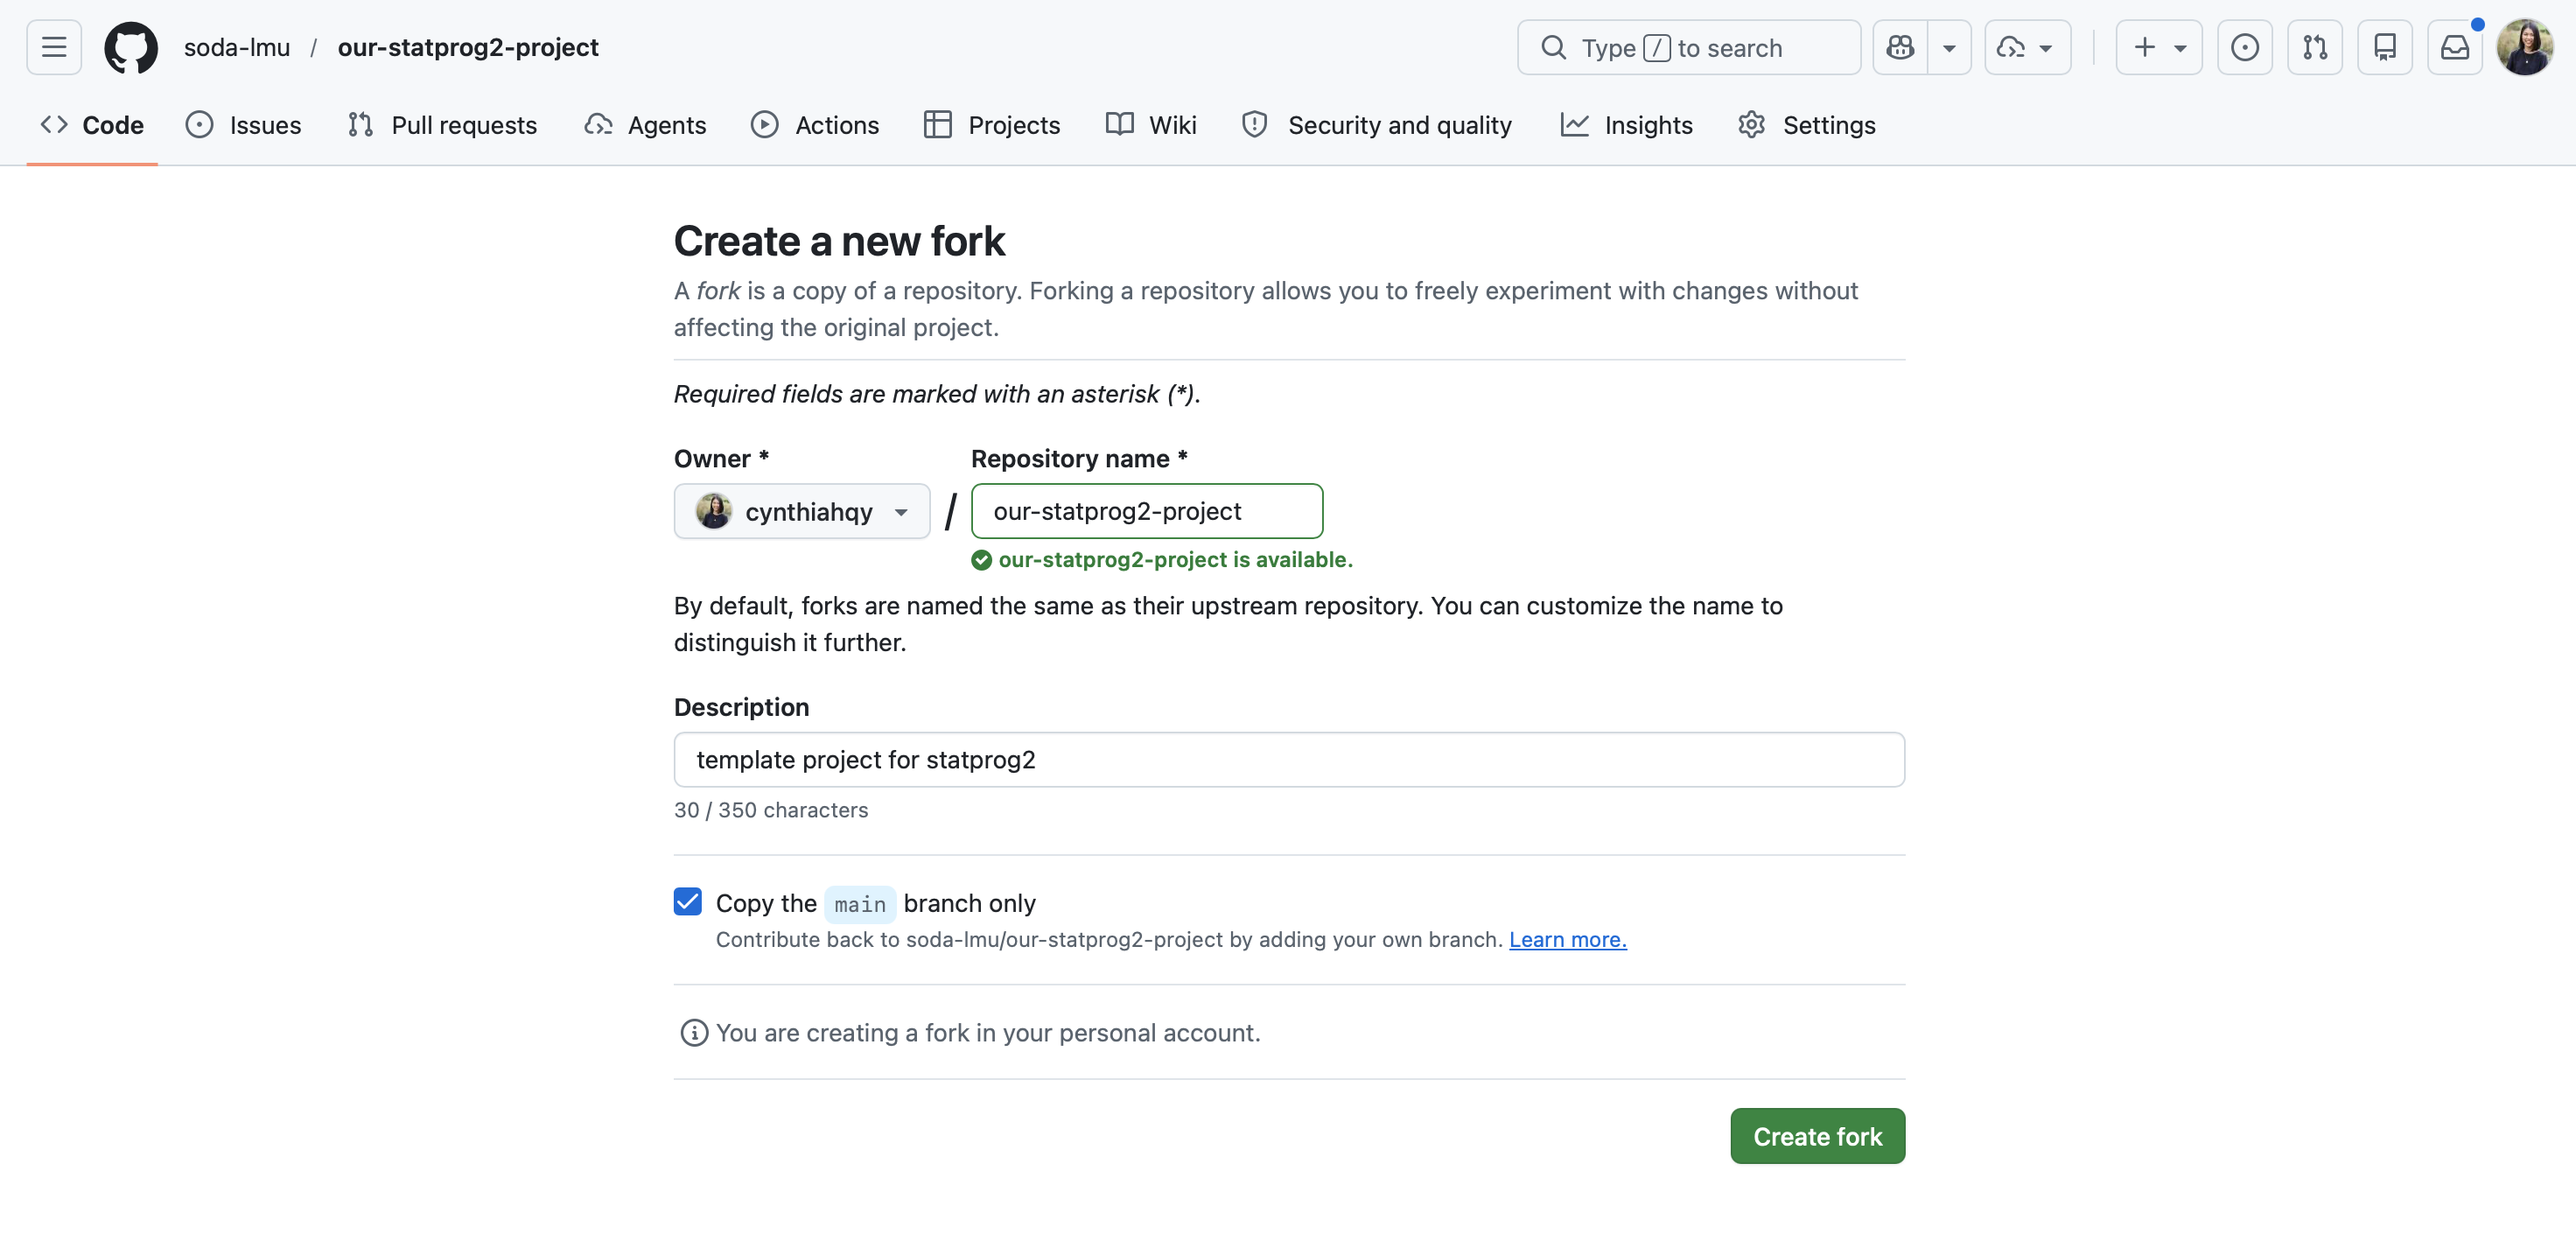
Give your fork a name

Fork an existing repository
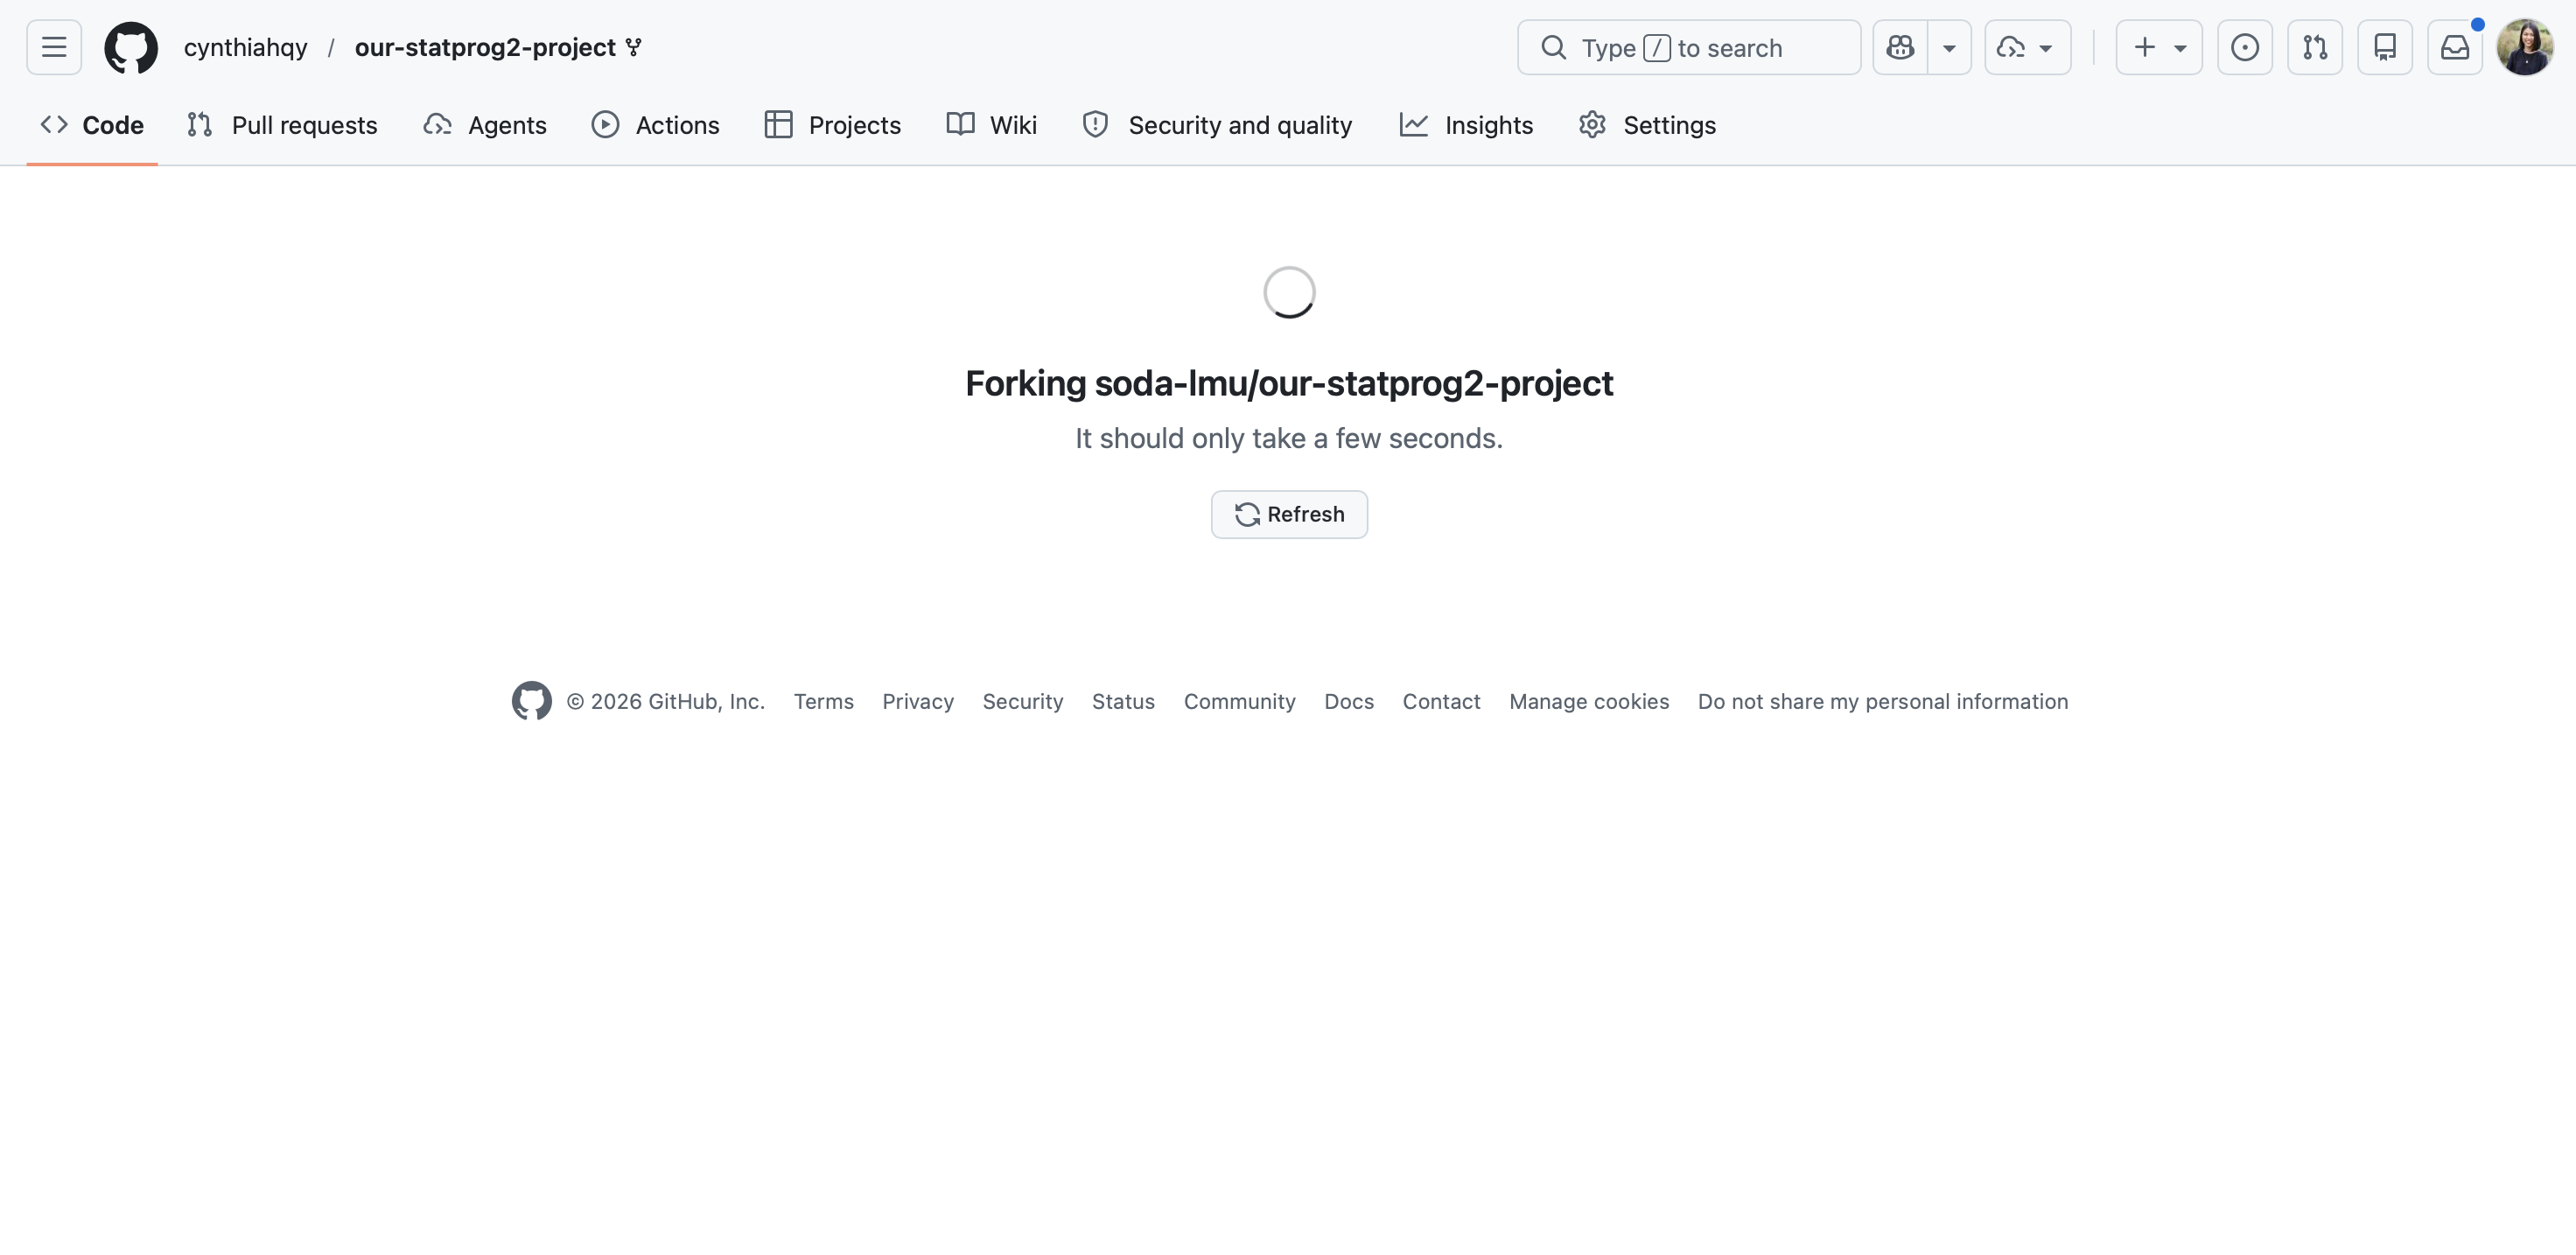
Forking in progress

Fork an existing repository
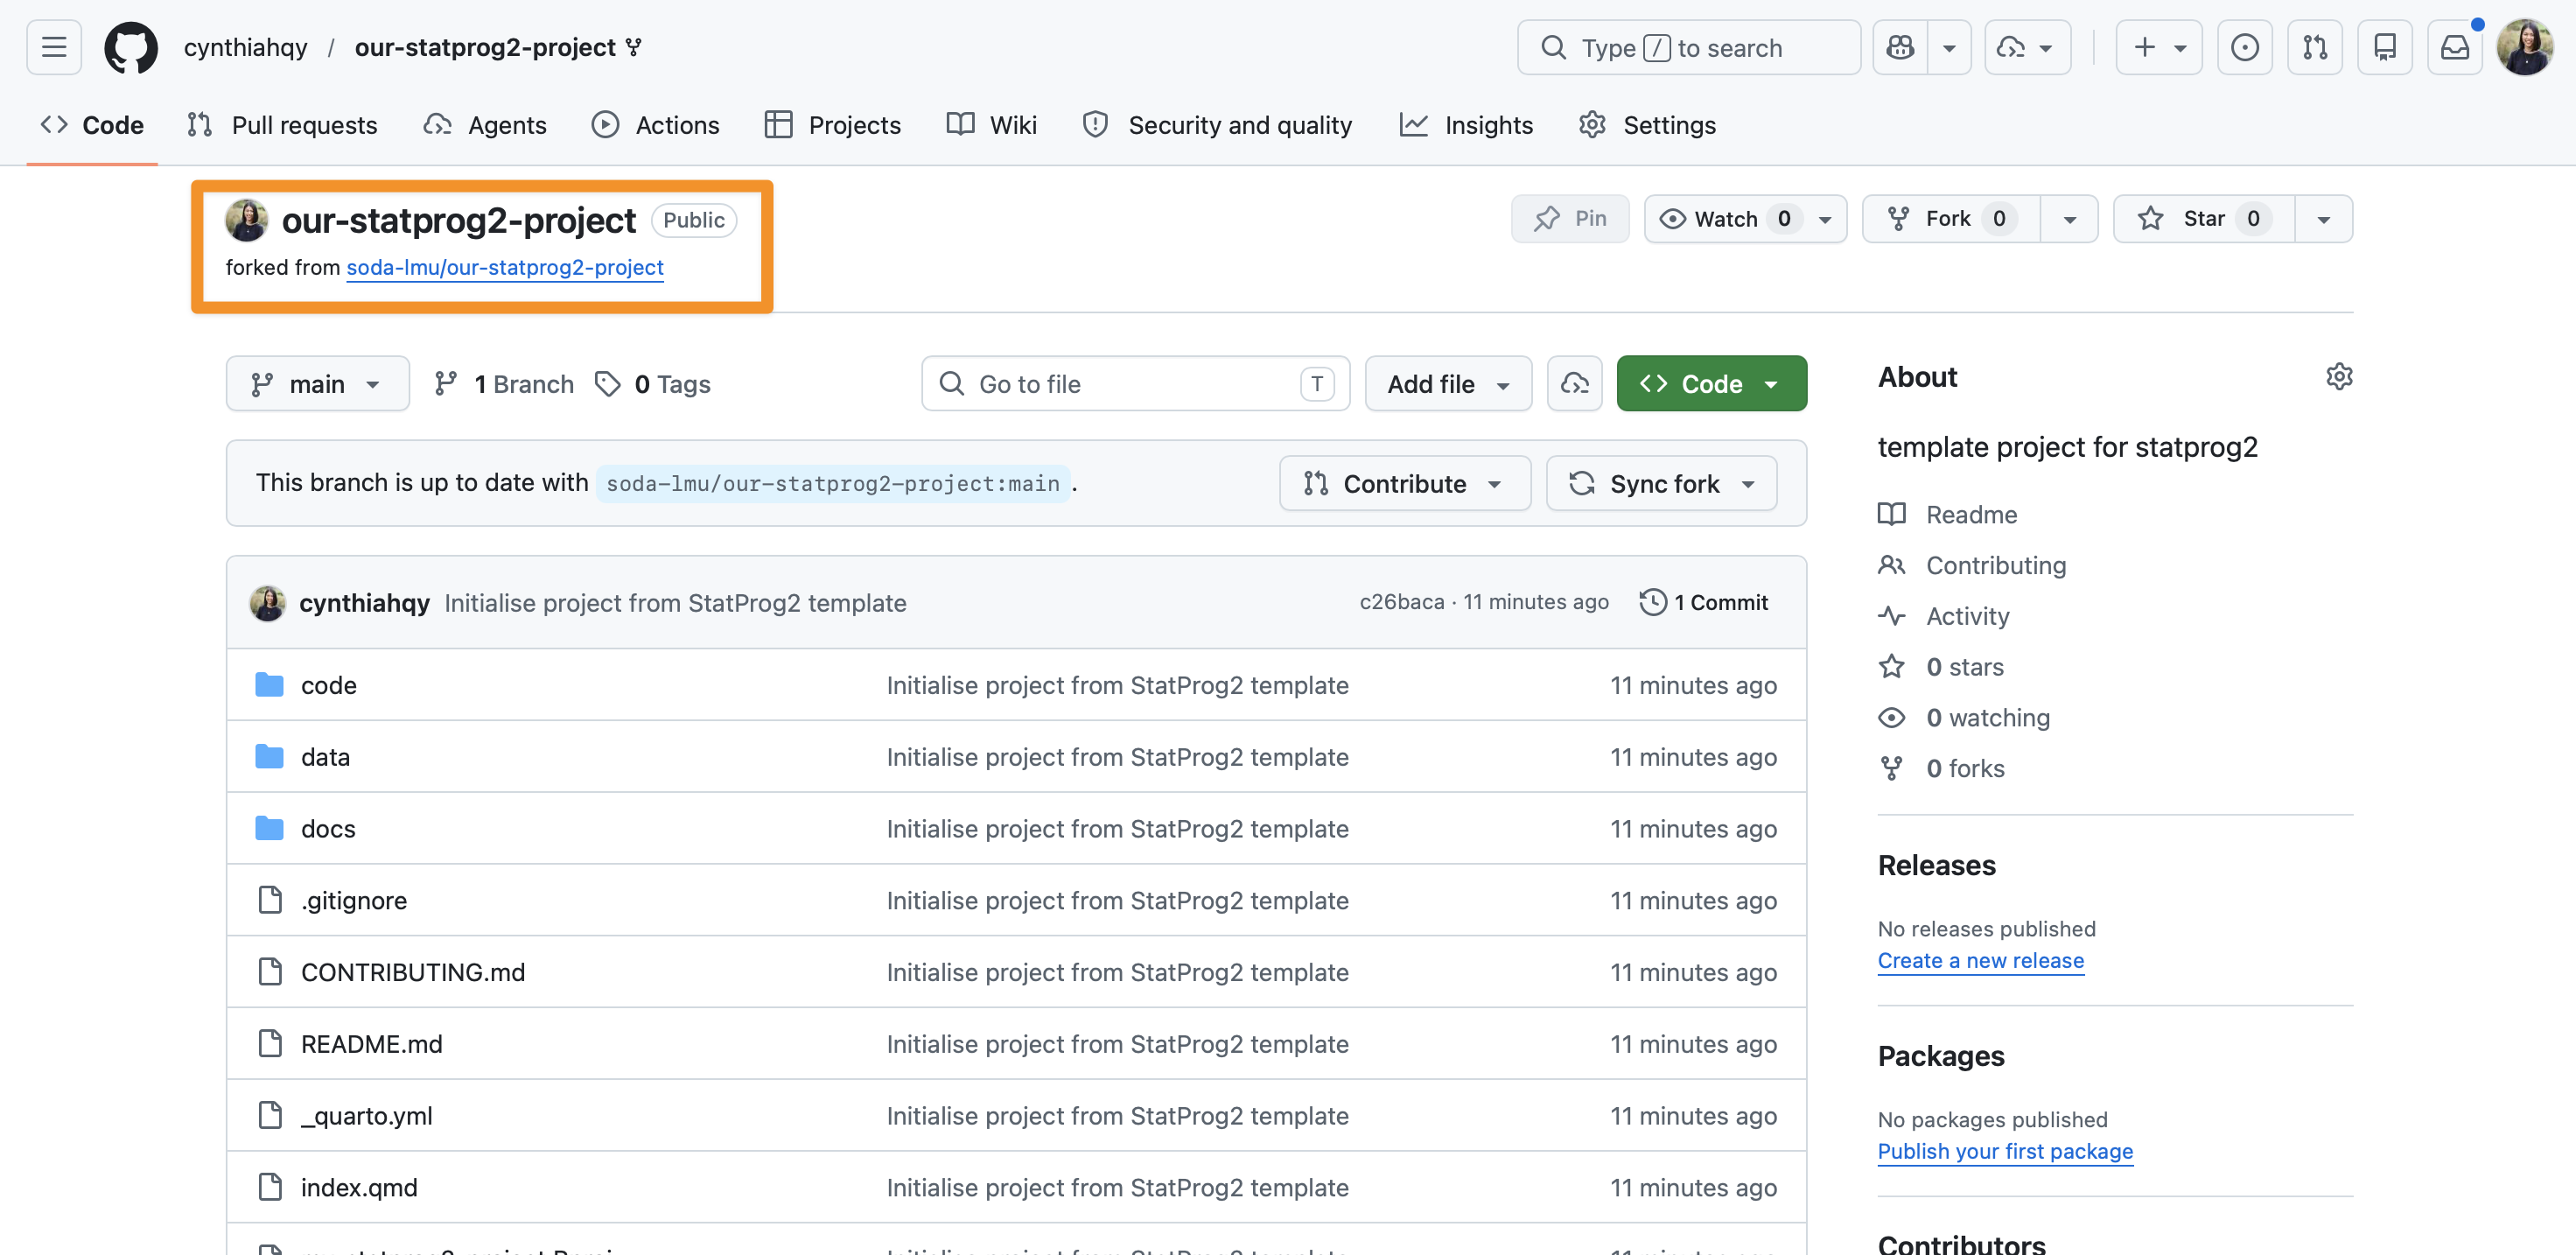
Notice the connection to the original repository

Clone an existing repository

Clone to your machine – automatically sets the remote.

git clone <url>    # copy a repo to your machine
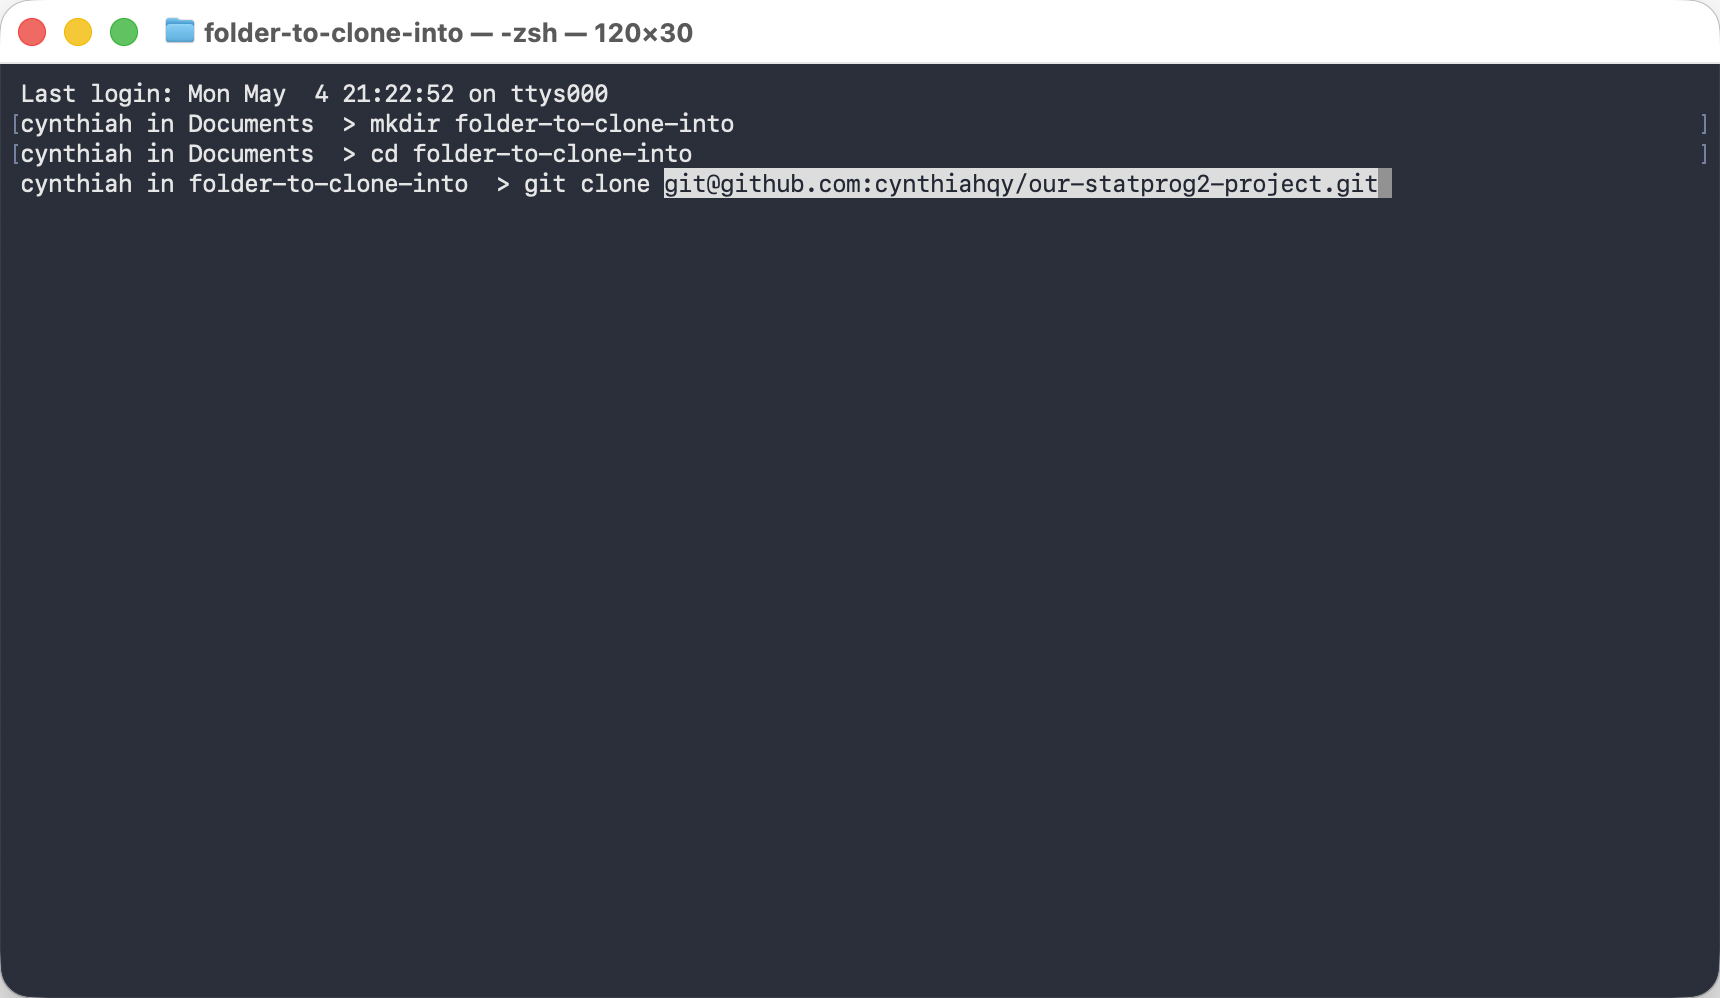
Clone an existing repository

Getting the URL
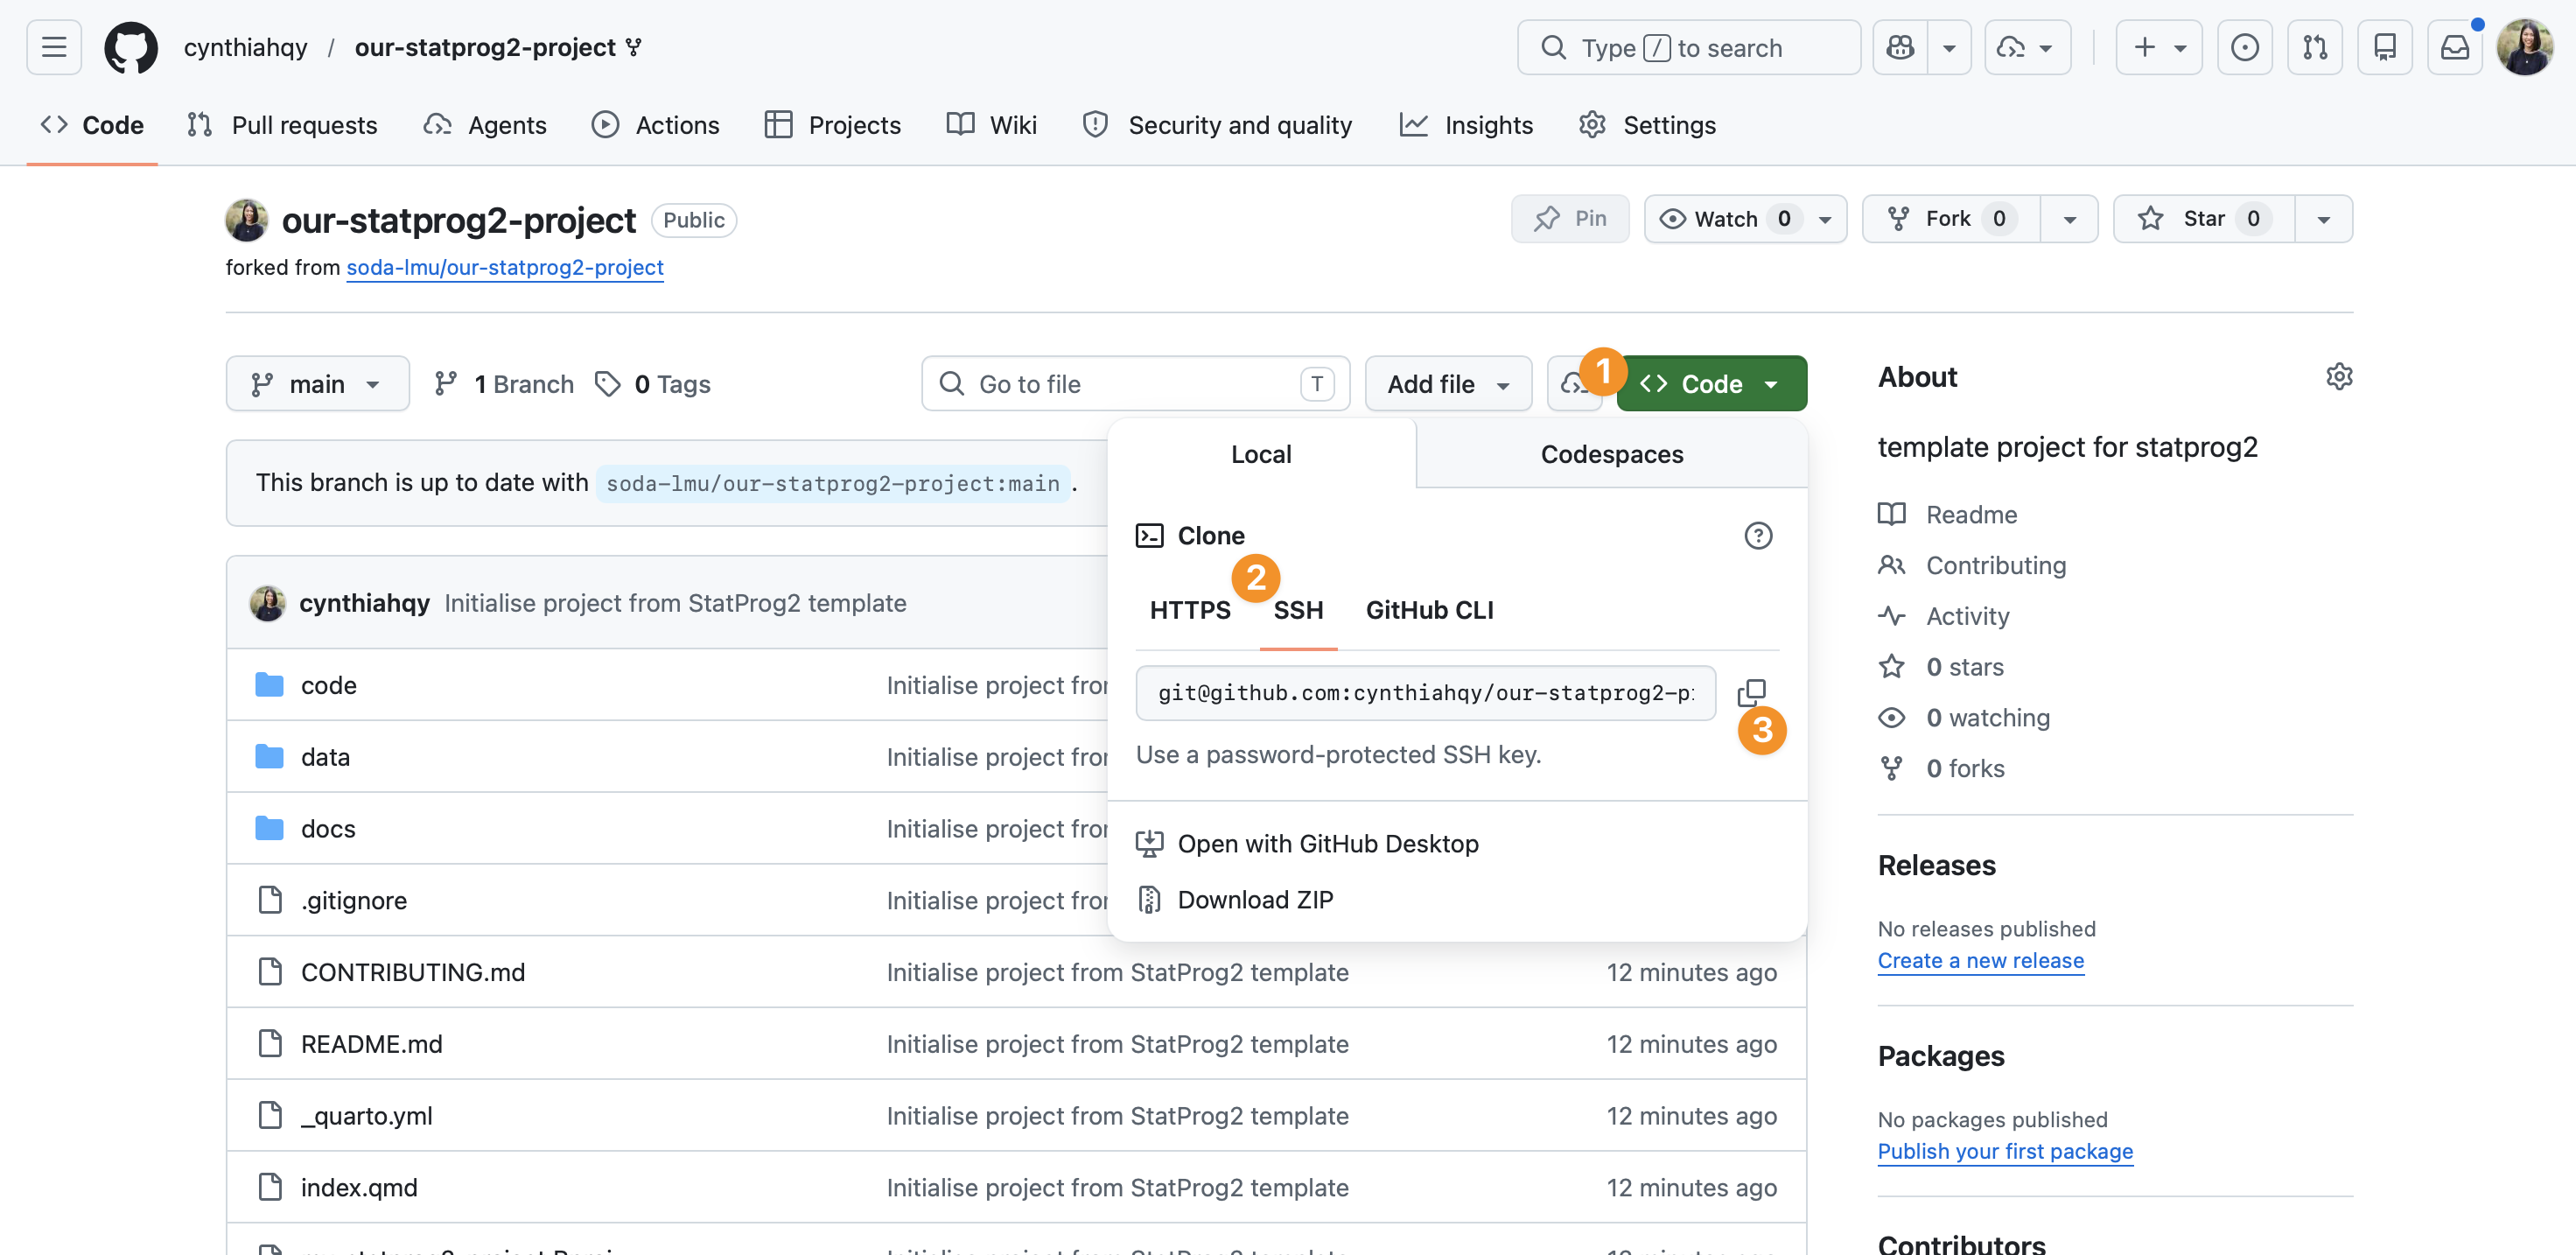
Clone an existing repository

Clone to your machine – automatically sets the remote.

git clone <url>    # copy a repo to your machine
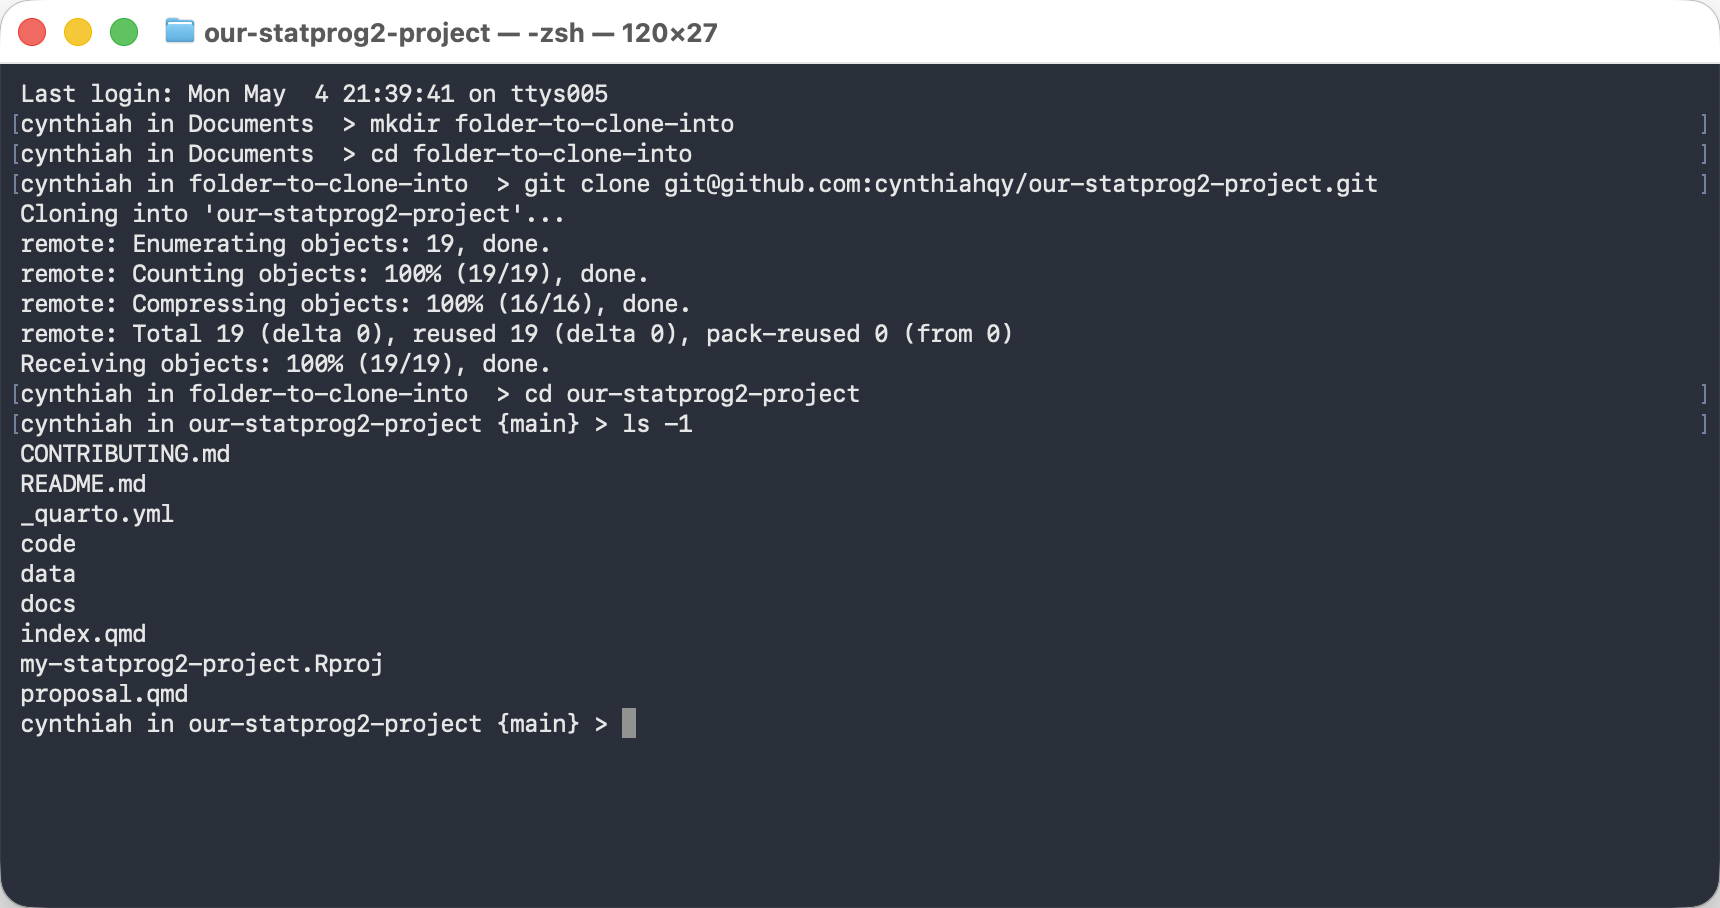
Working with Remotes

The day-to-day loop

GitHub  ──clone──▶  local             (once, to set up)
GitHub  ──pull───▶  local             (start of each session)
local   ──push───▶  GitHub            (end of each session)
  1. git pull — get your collaborators’ latest commits
  2. Edit files, run code
  3. git add + git commit — save your work in logical chunks
  4. git push — share your commits with the team

Tip

Pull at the start of every session, push at the end. This keeps conflicts small and your team in sync.

In RStudio: Edit

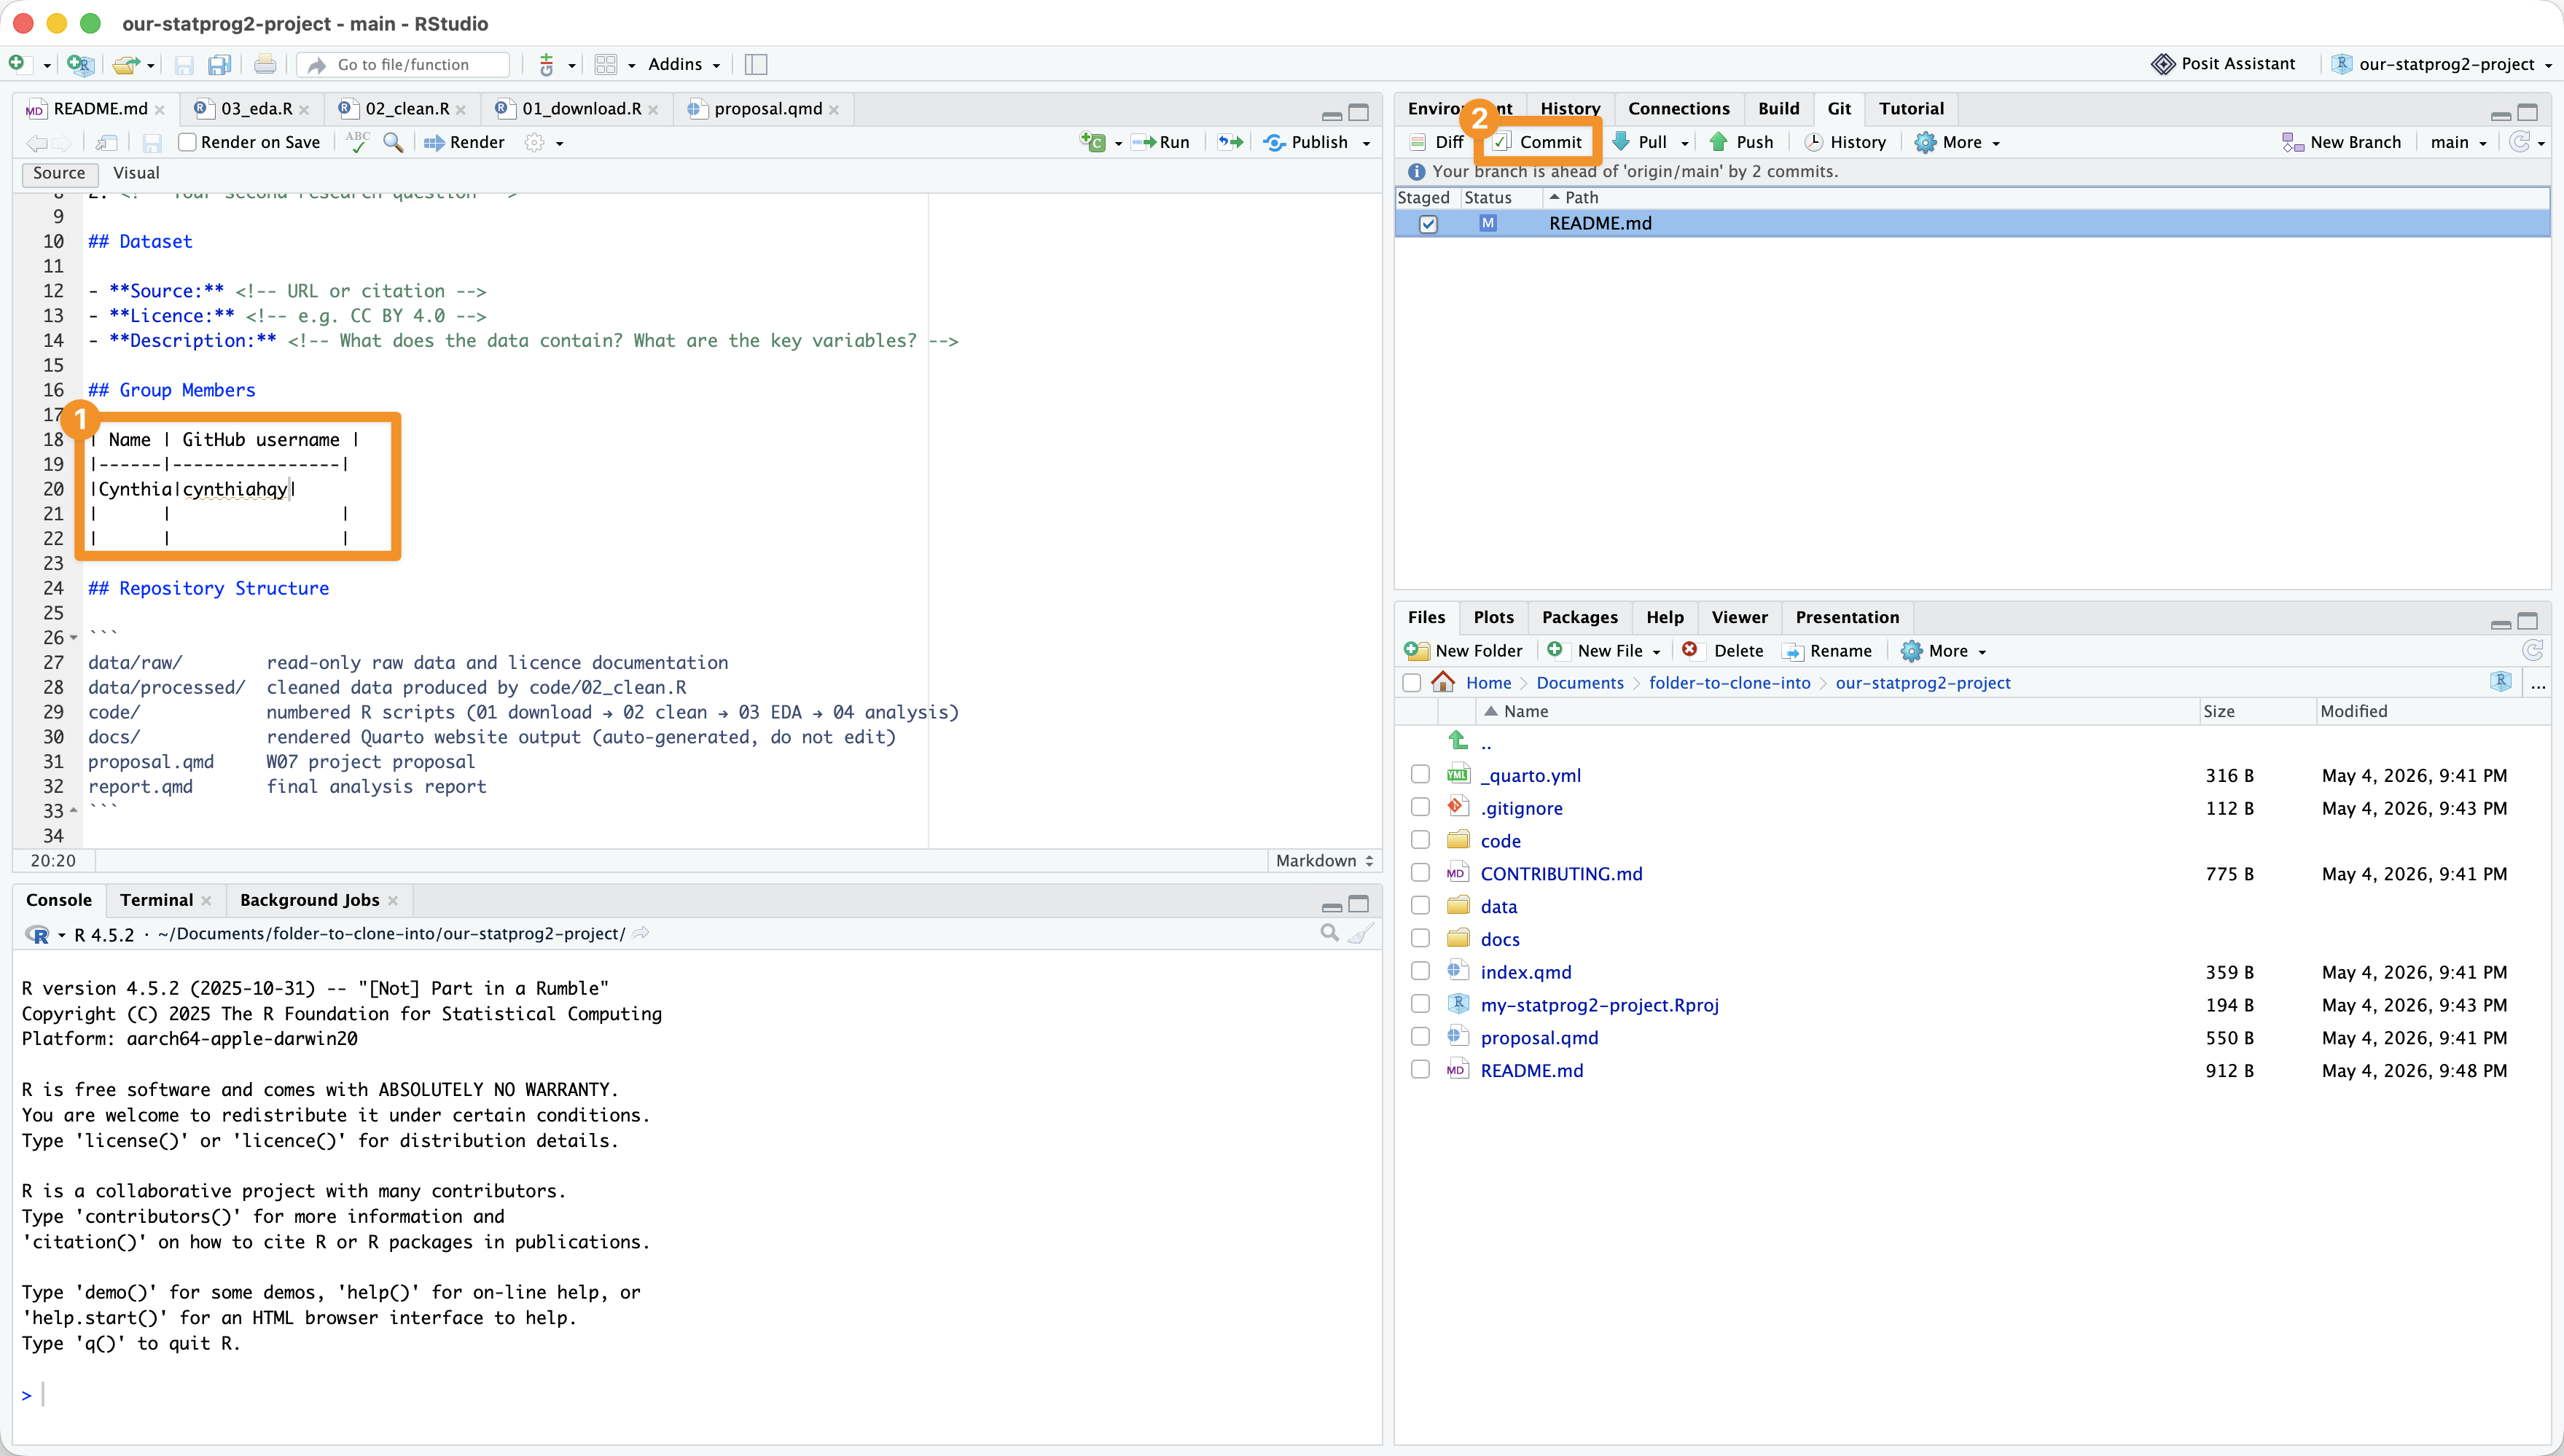
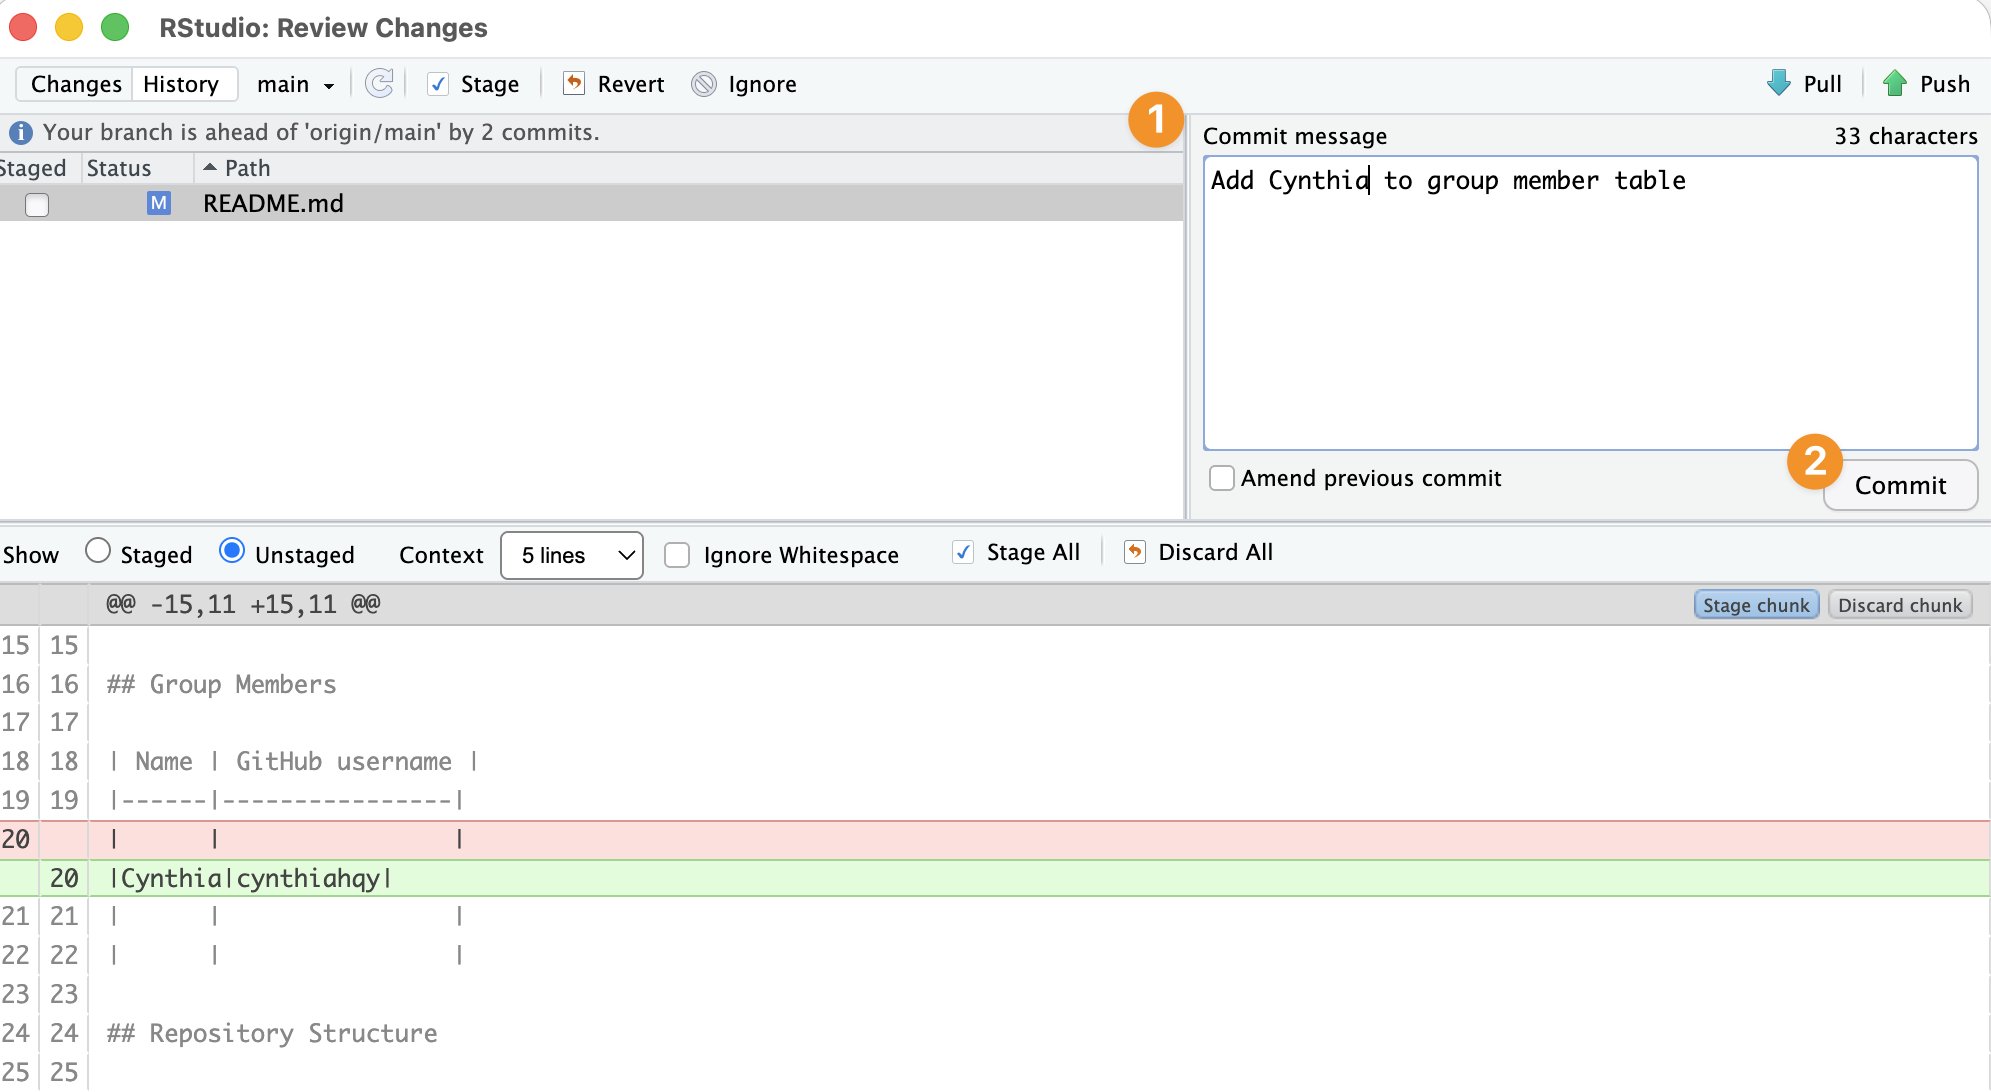
In RStudio: Commit

What CLI commands is RStudio performing for you?

In RStudio: Push
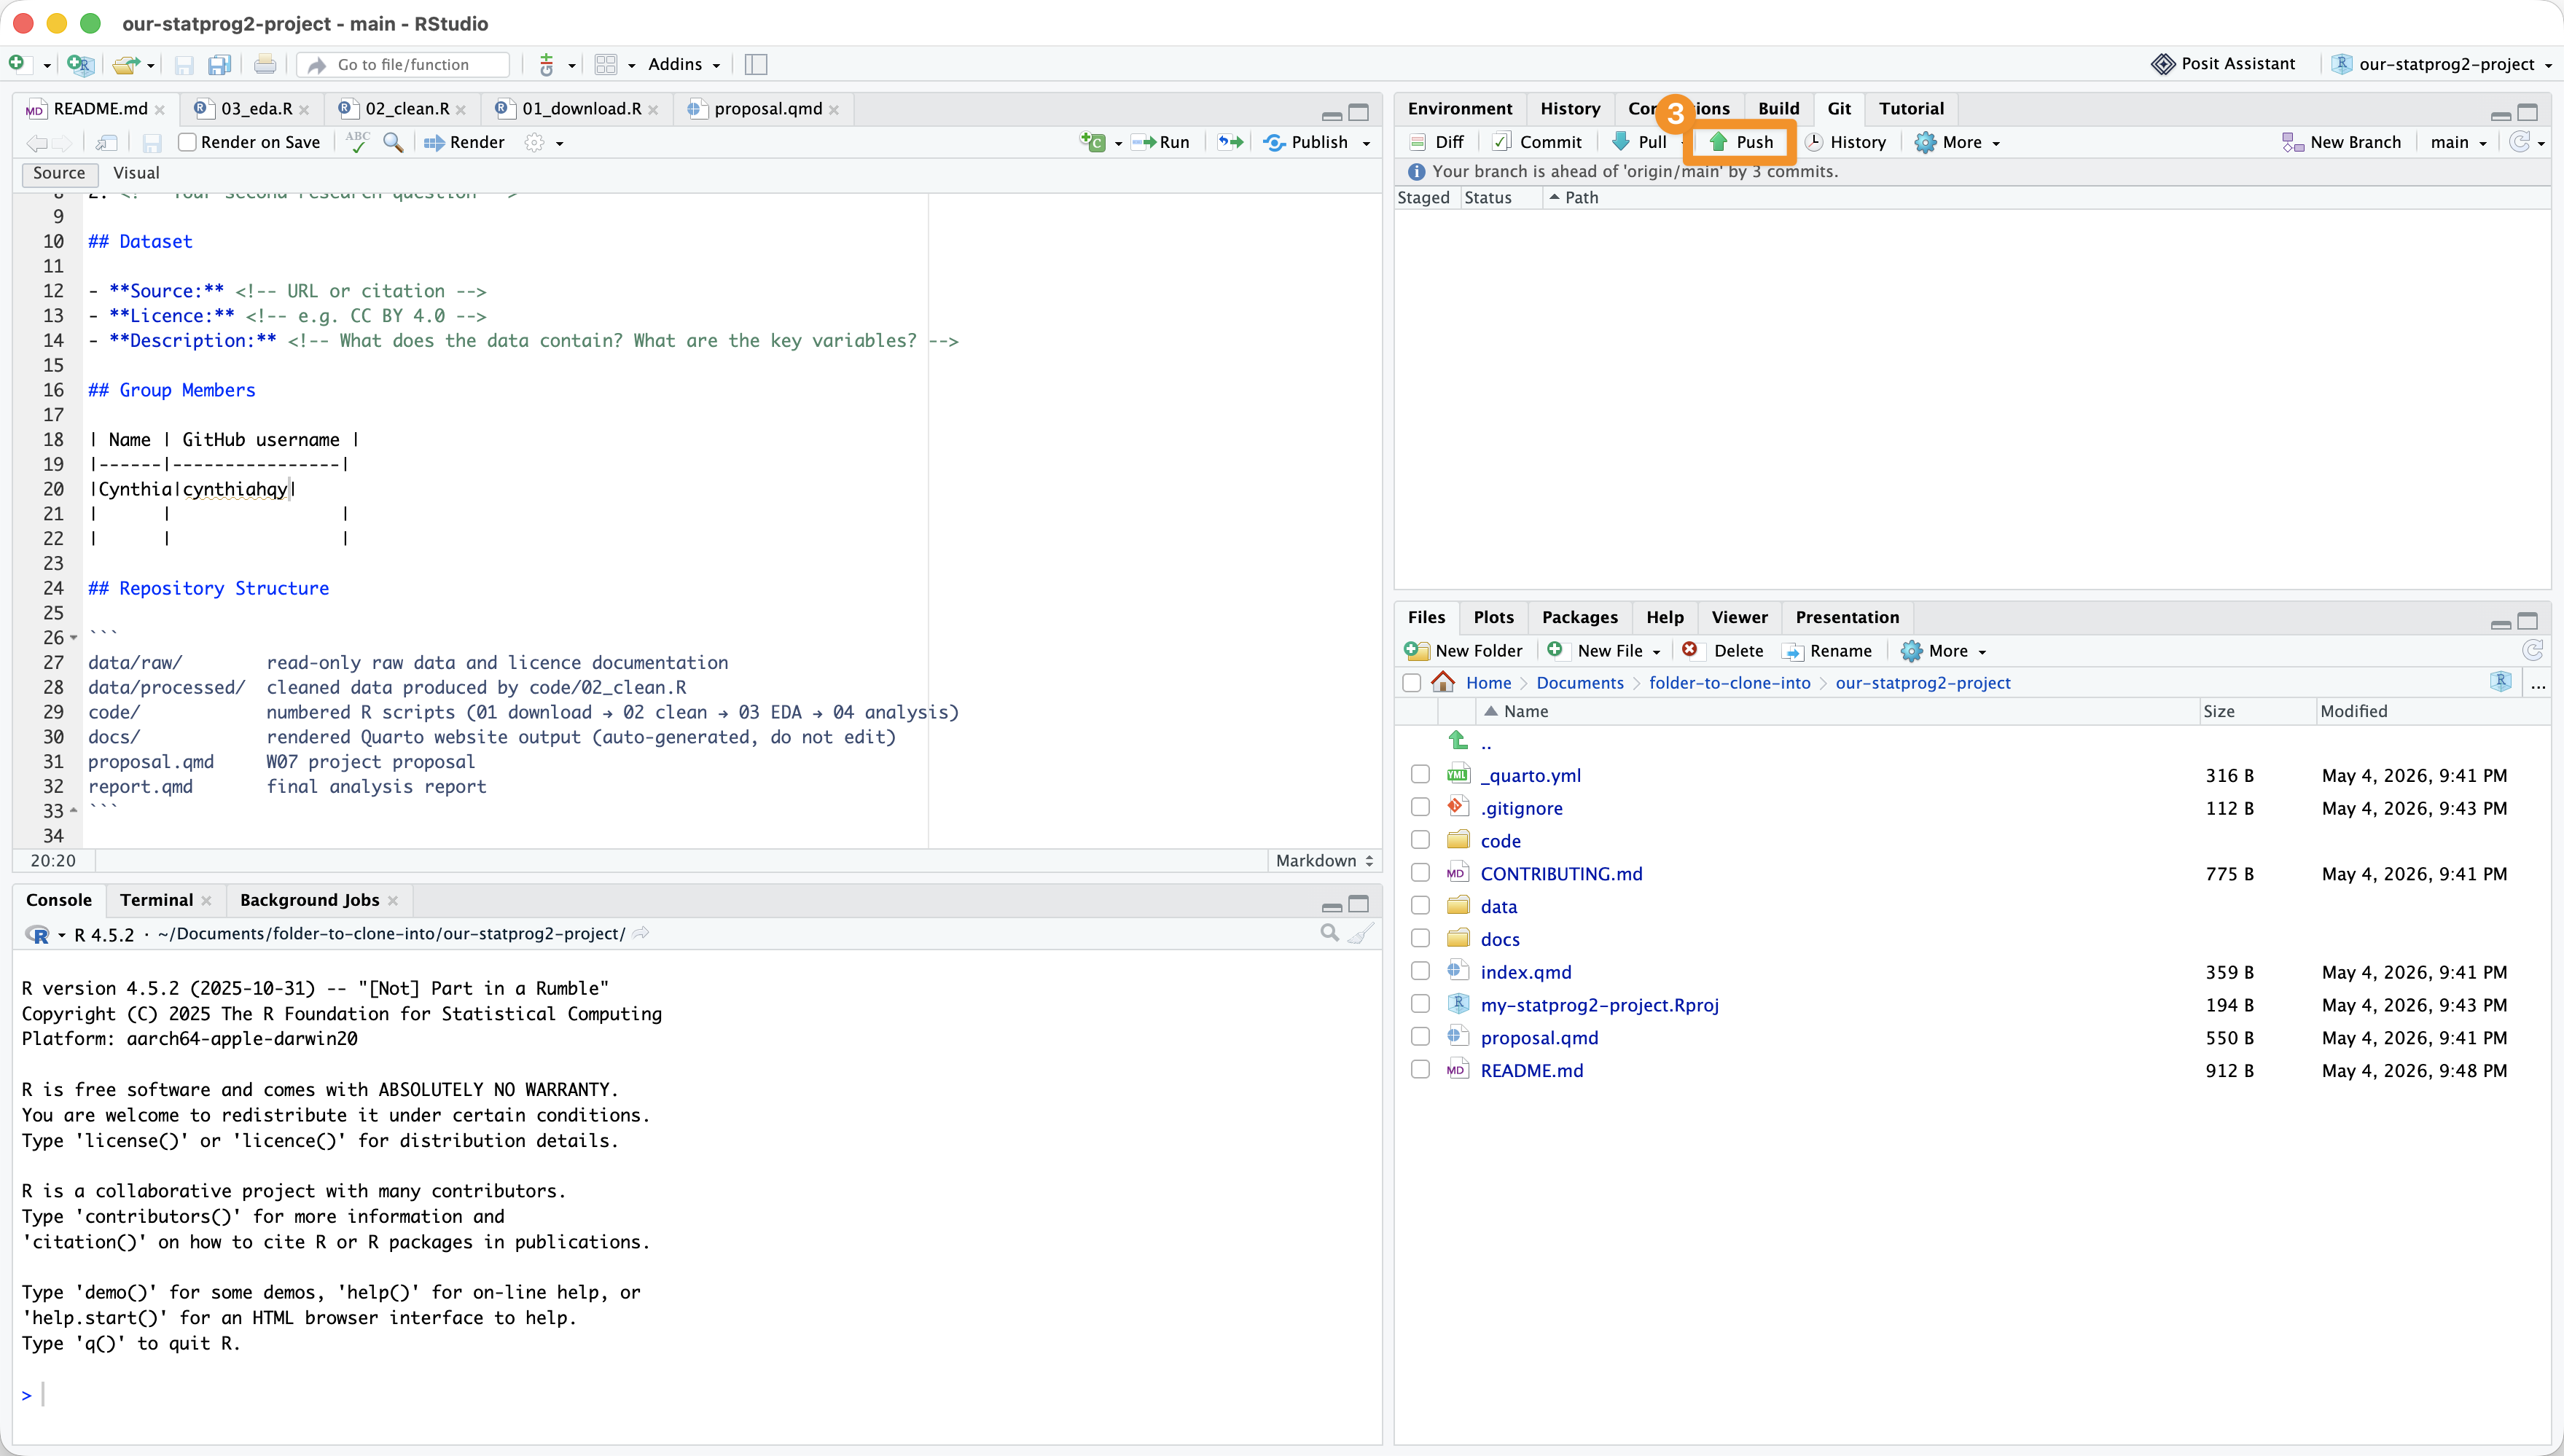
In RStudio: Rejected Push???
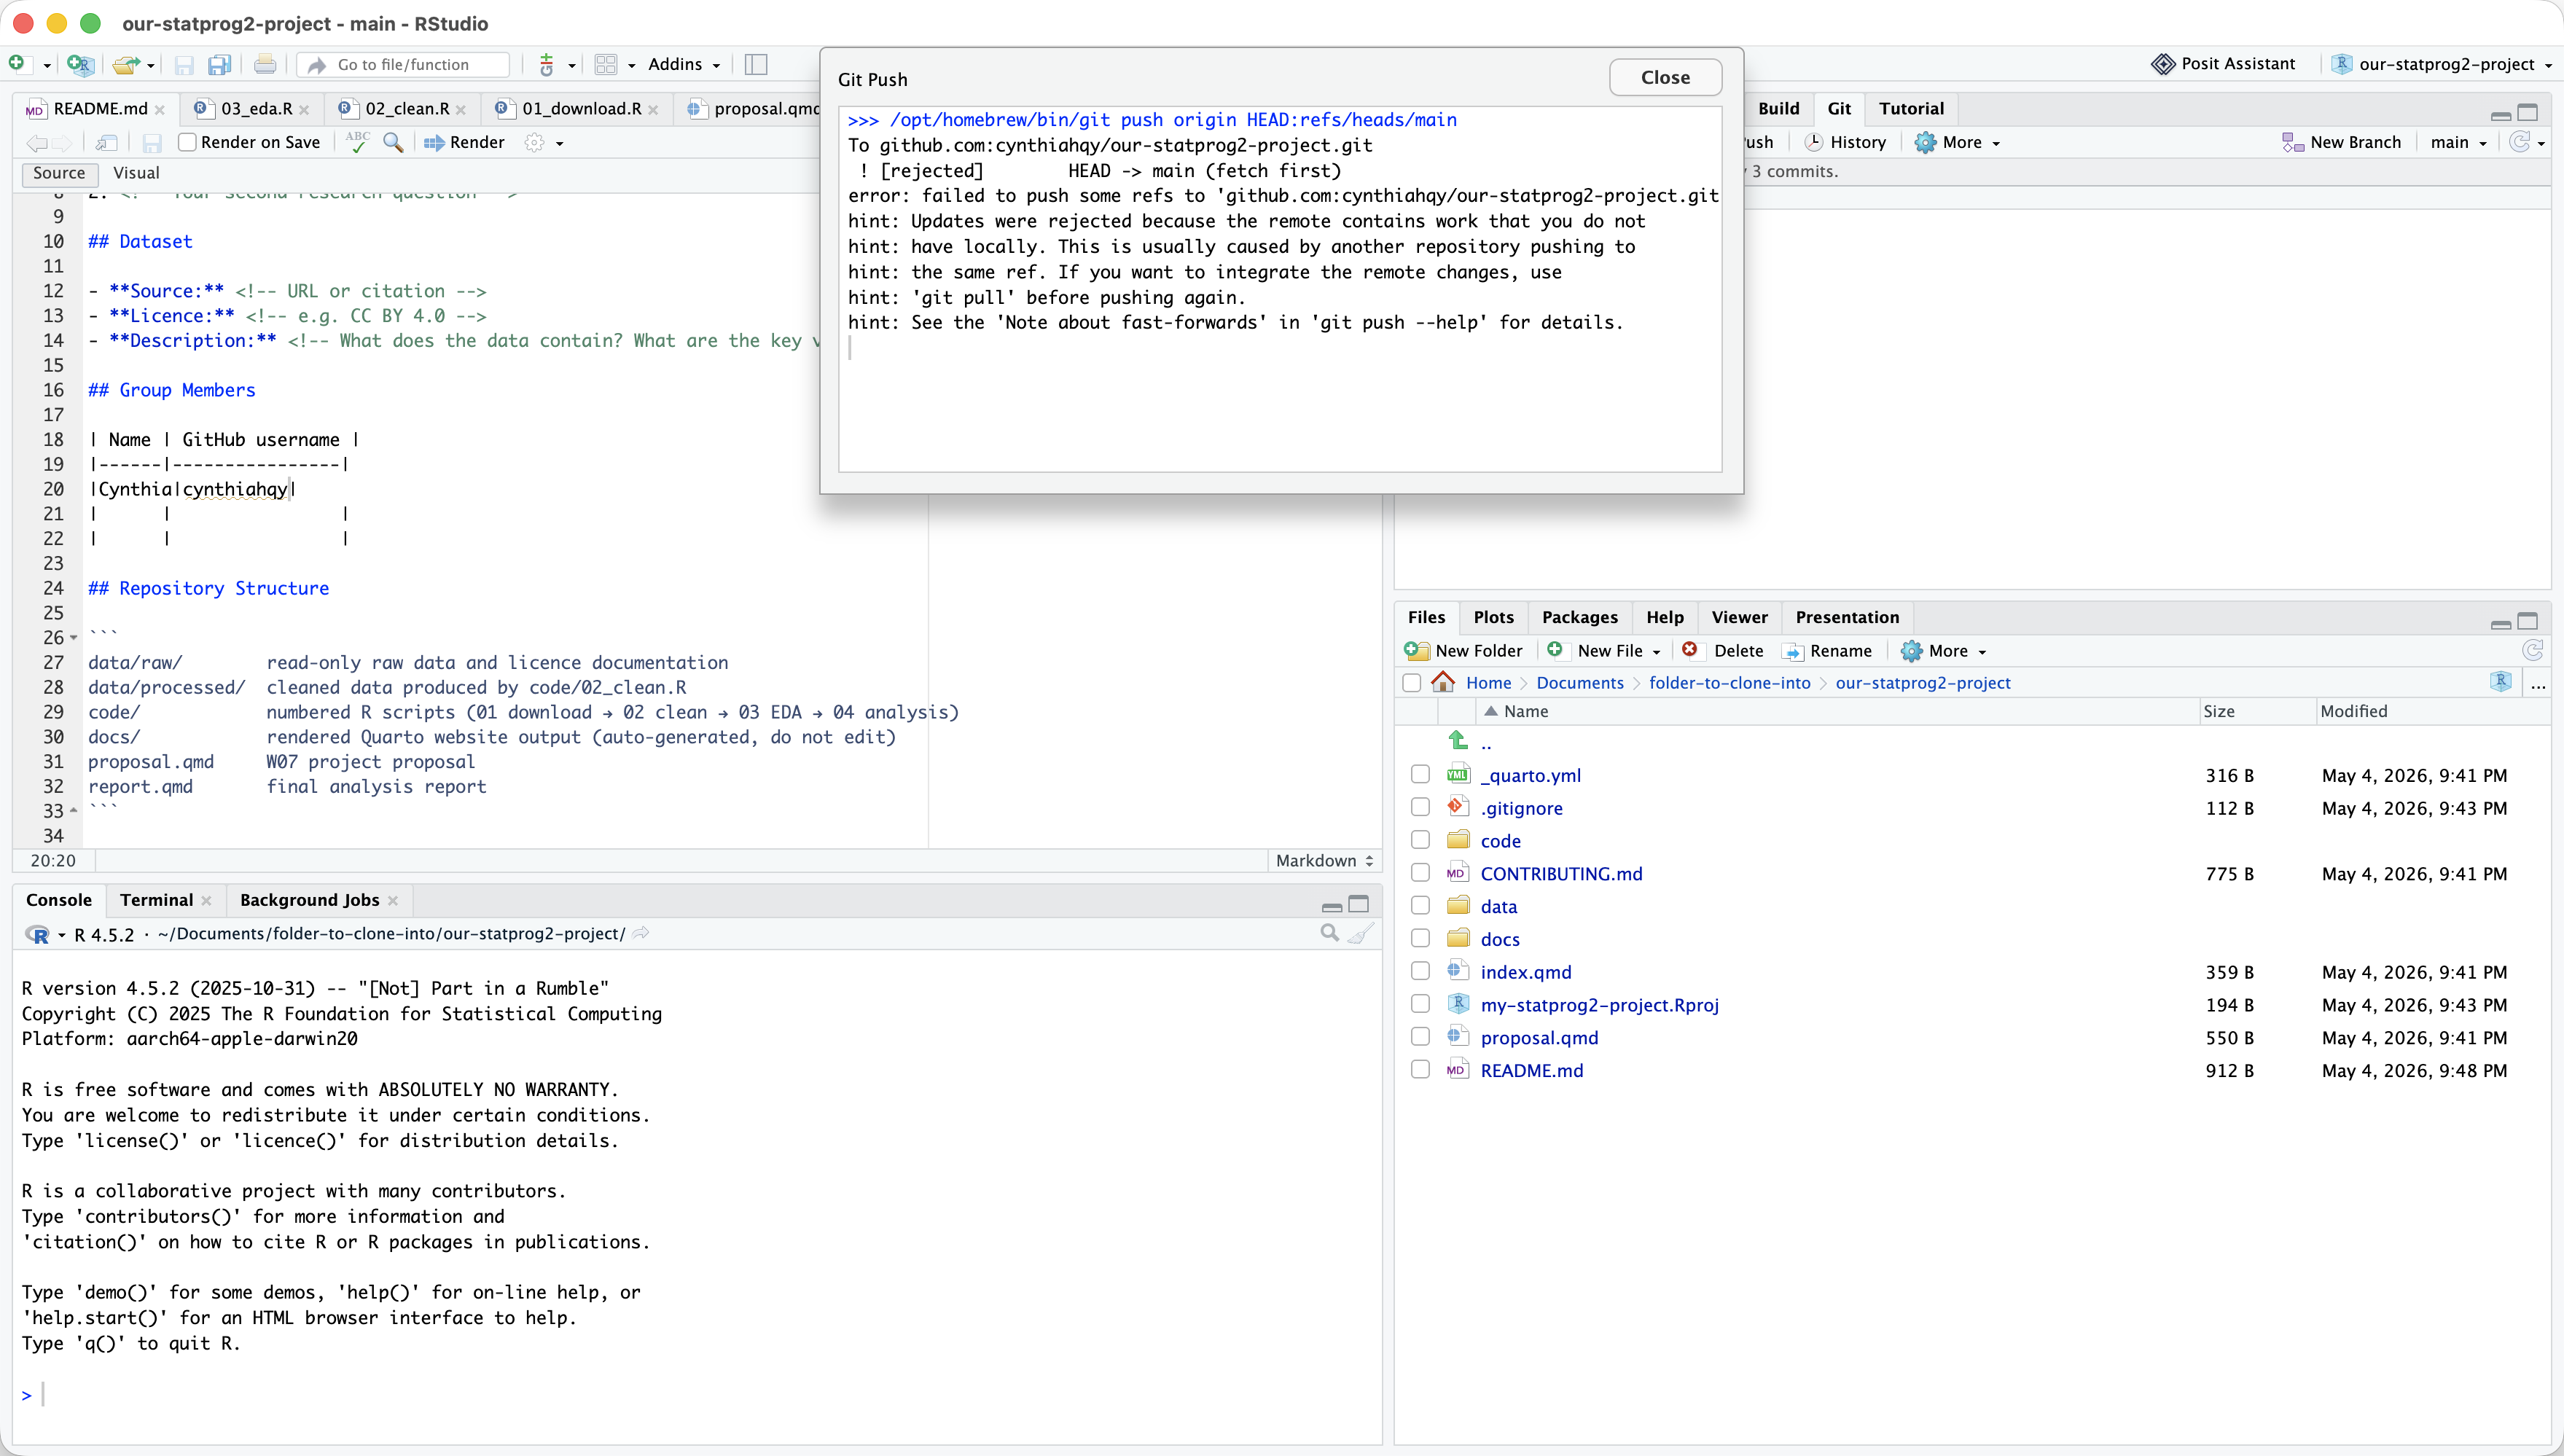
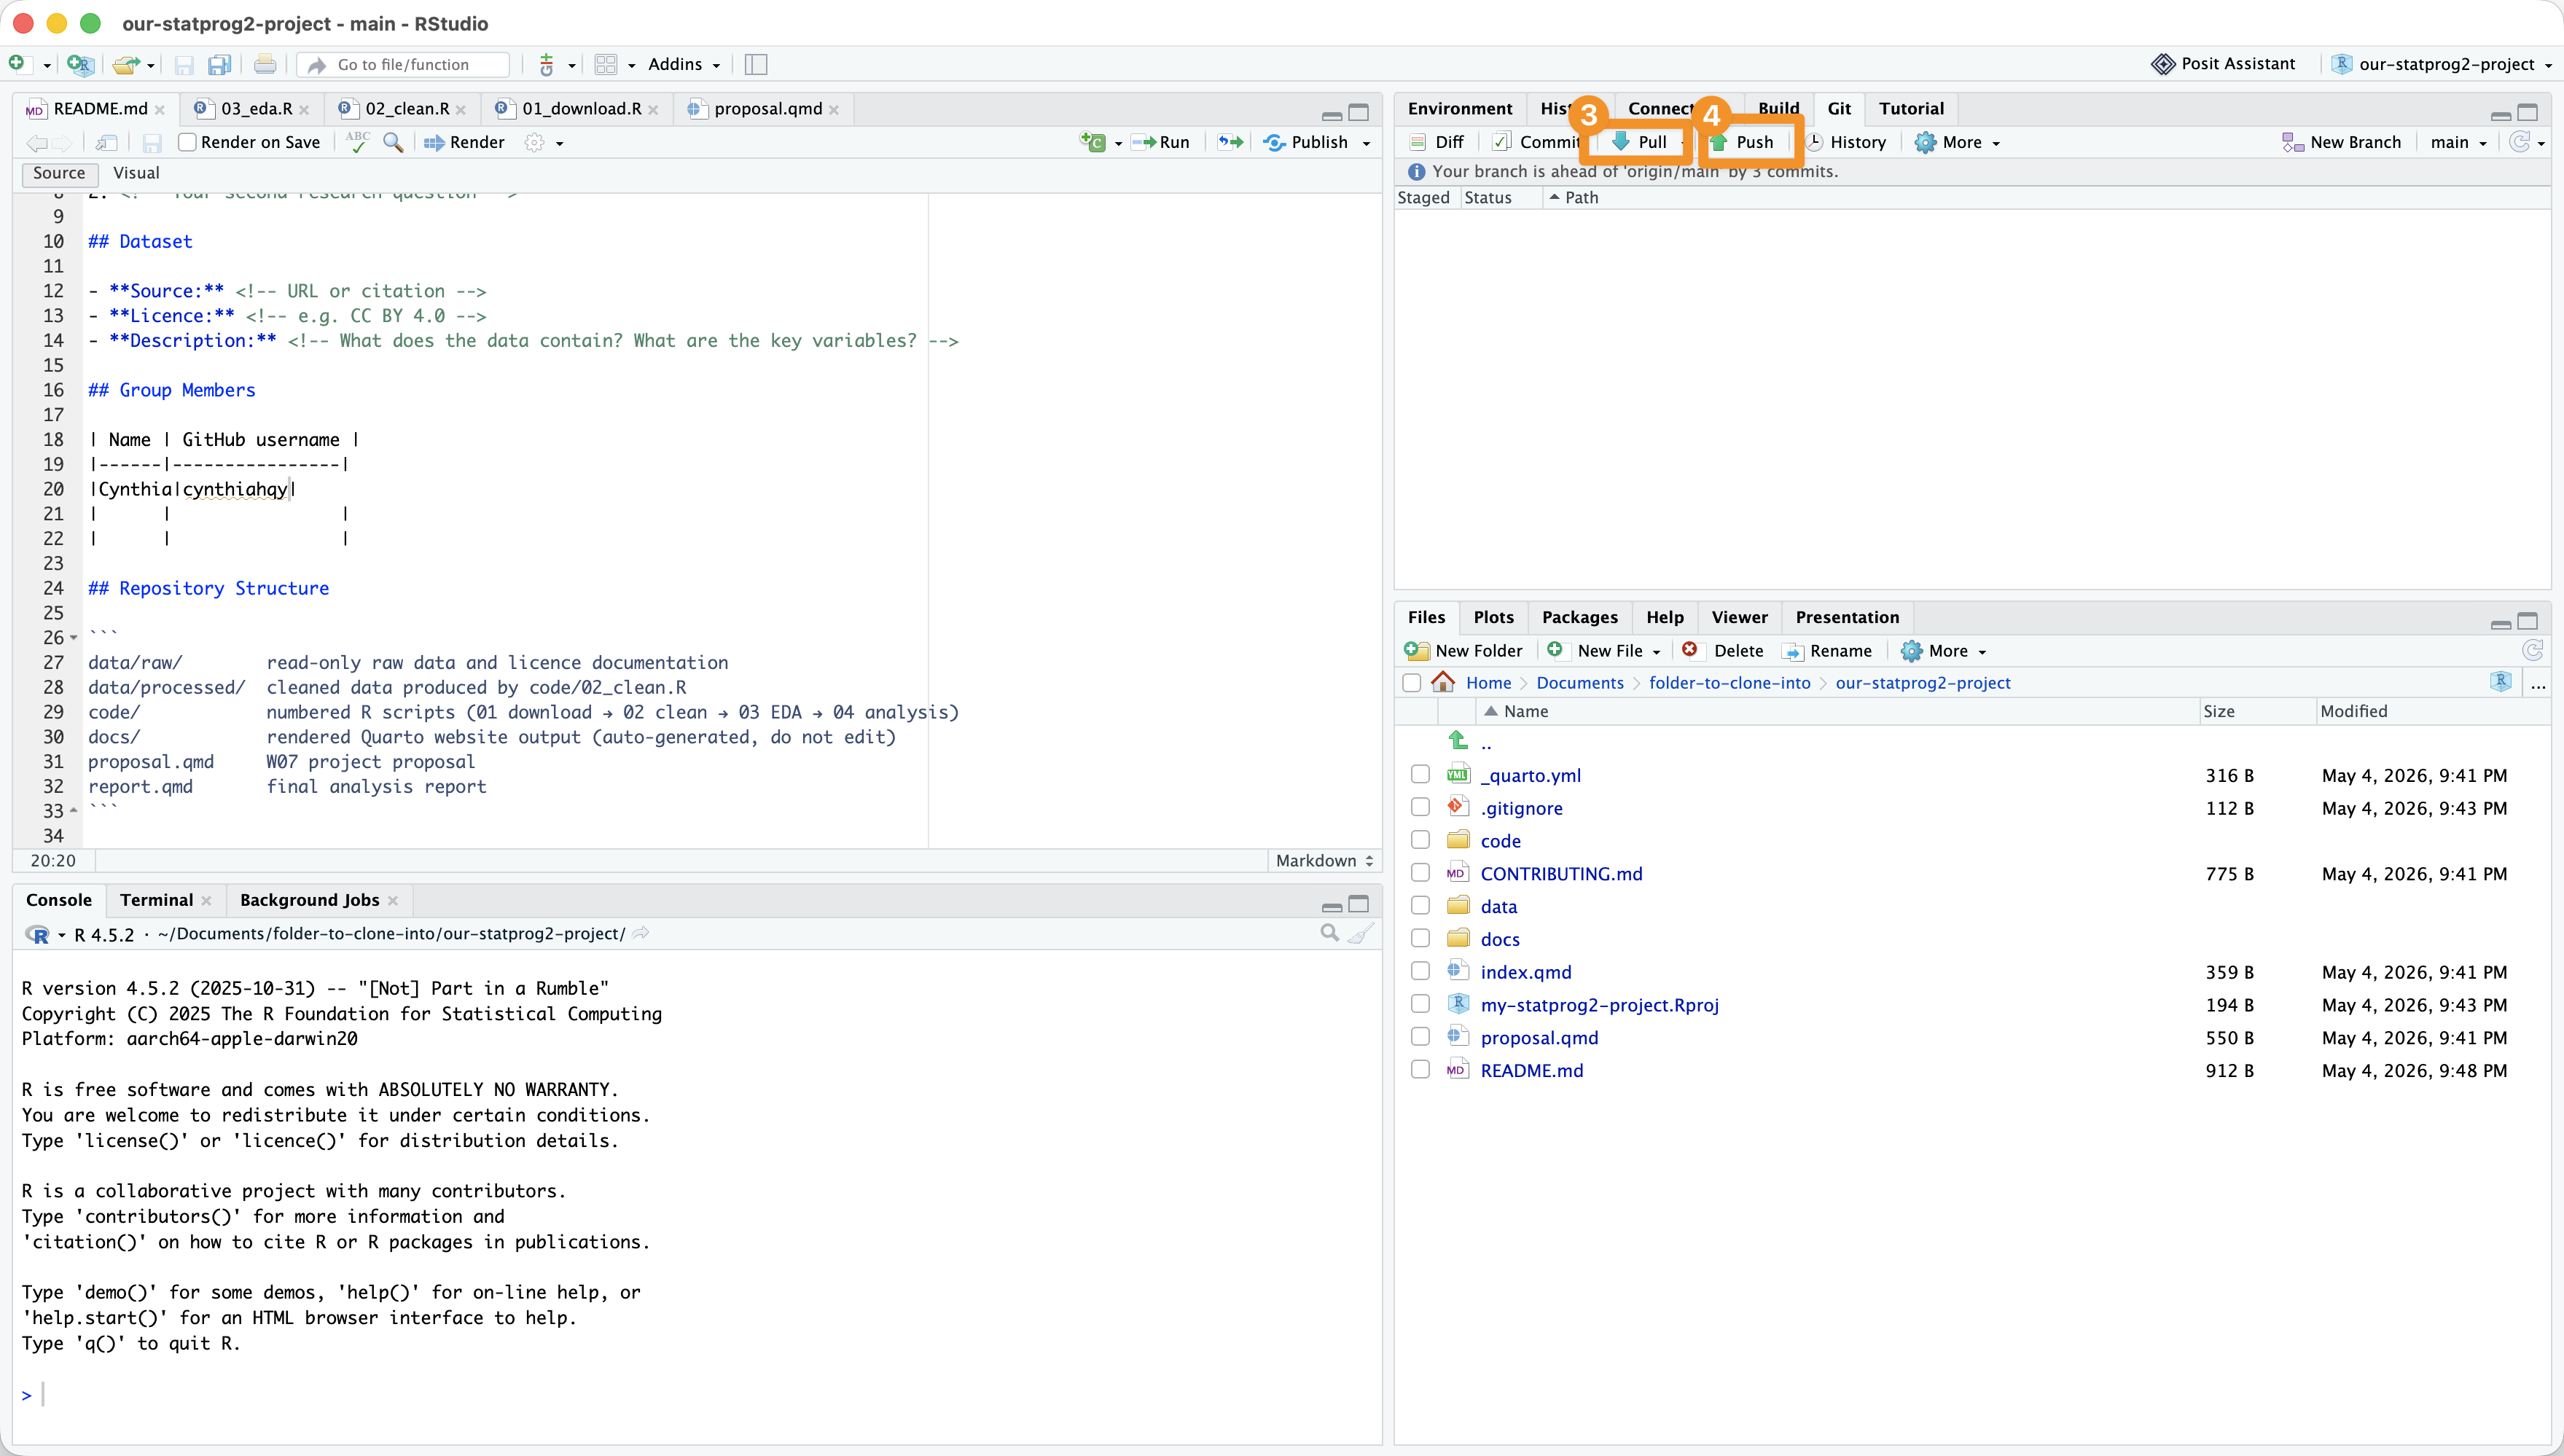
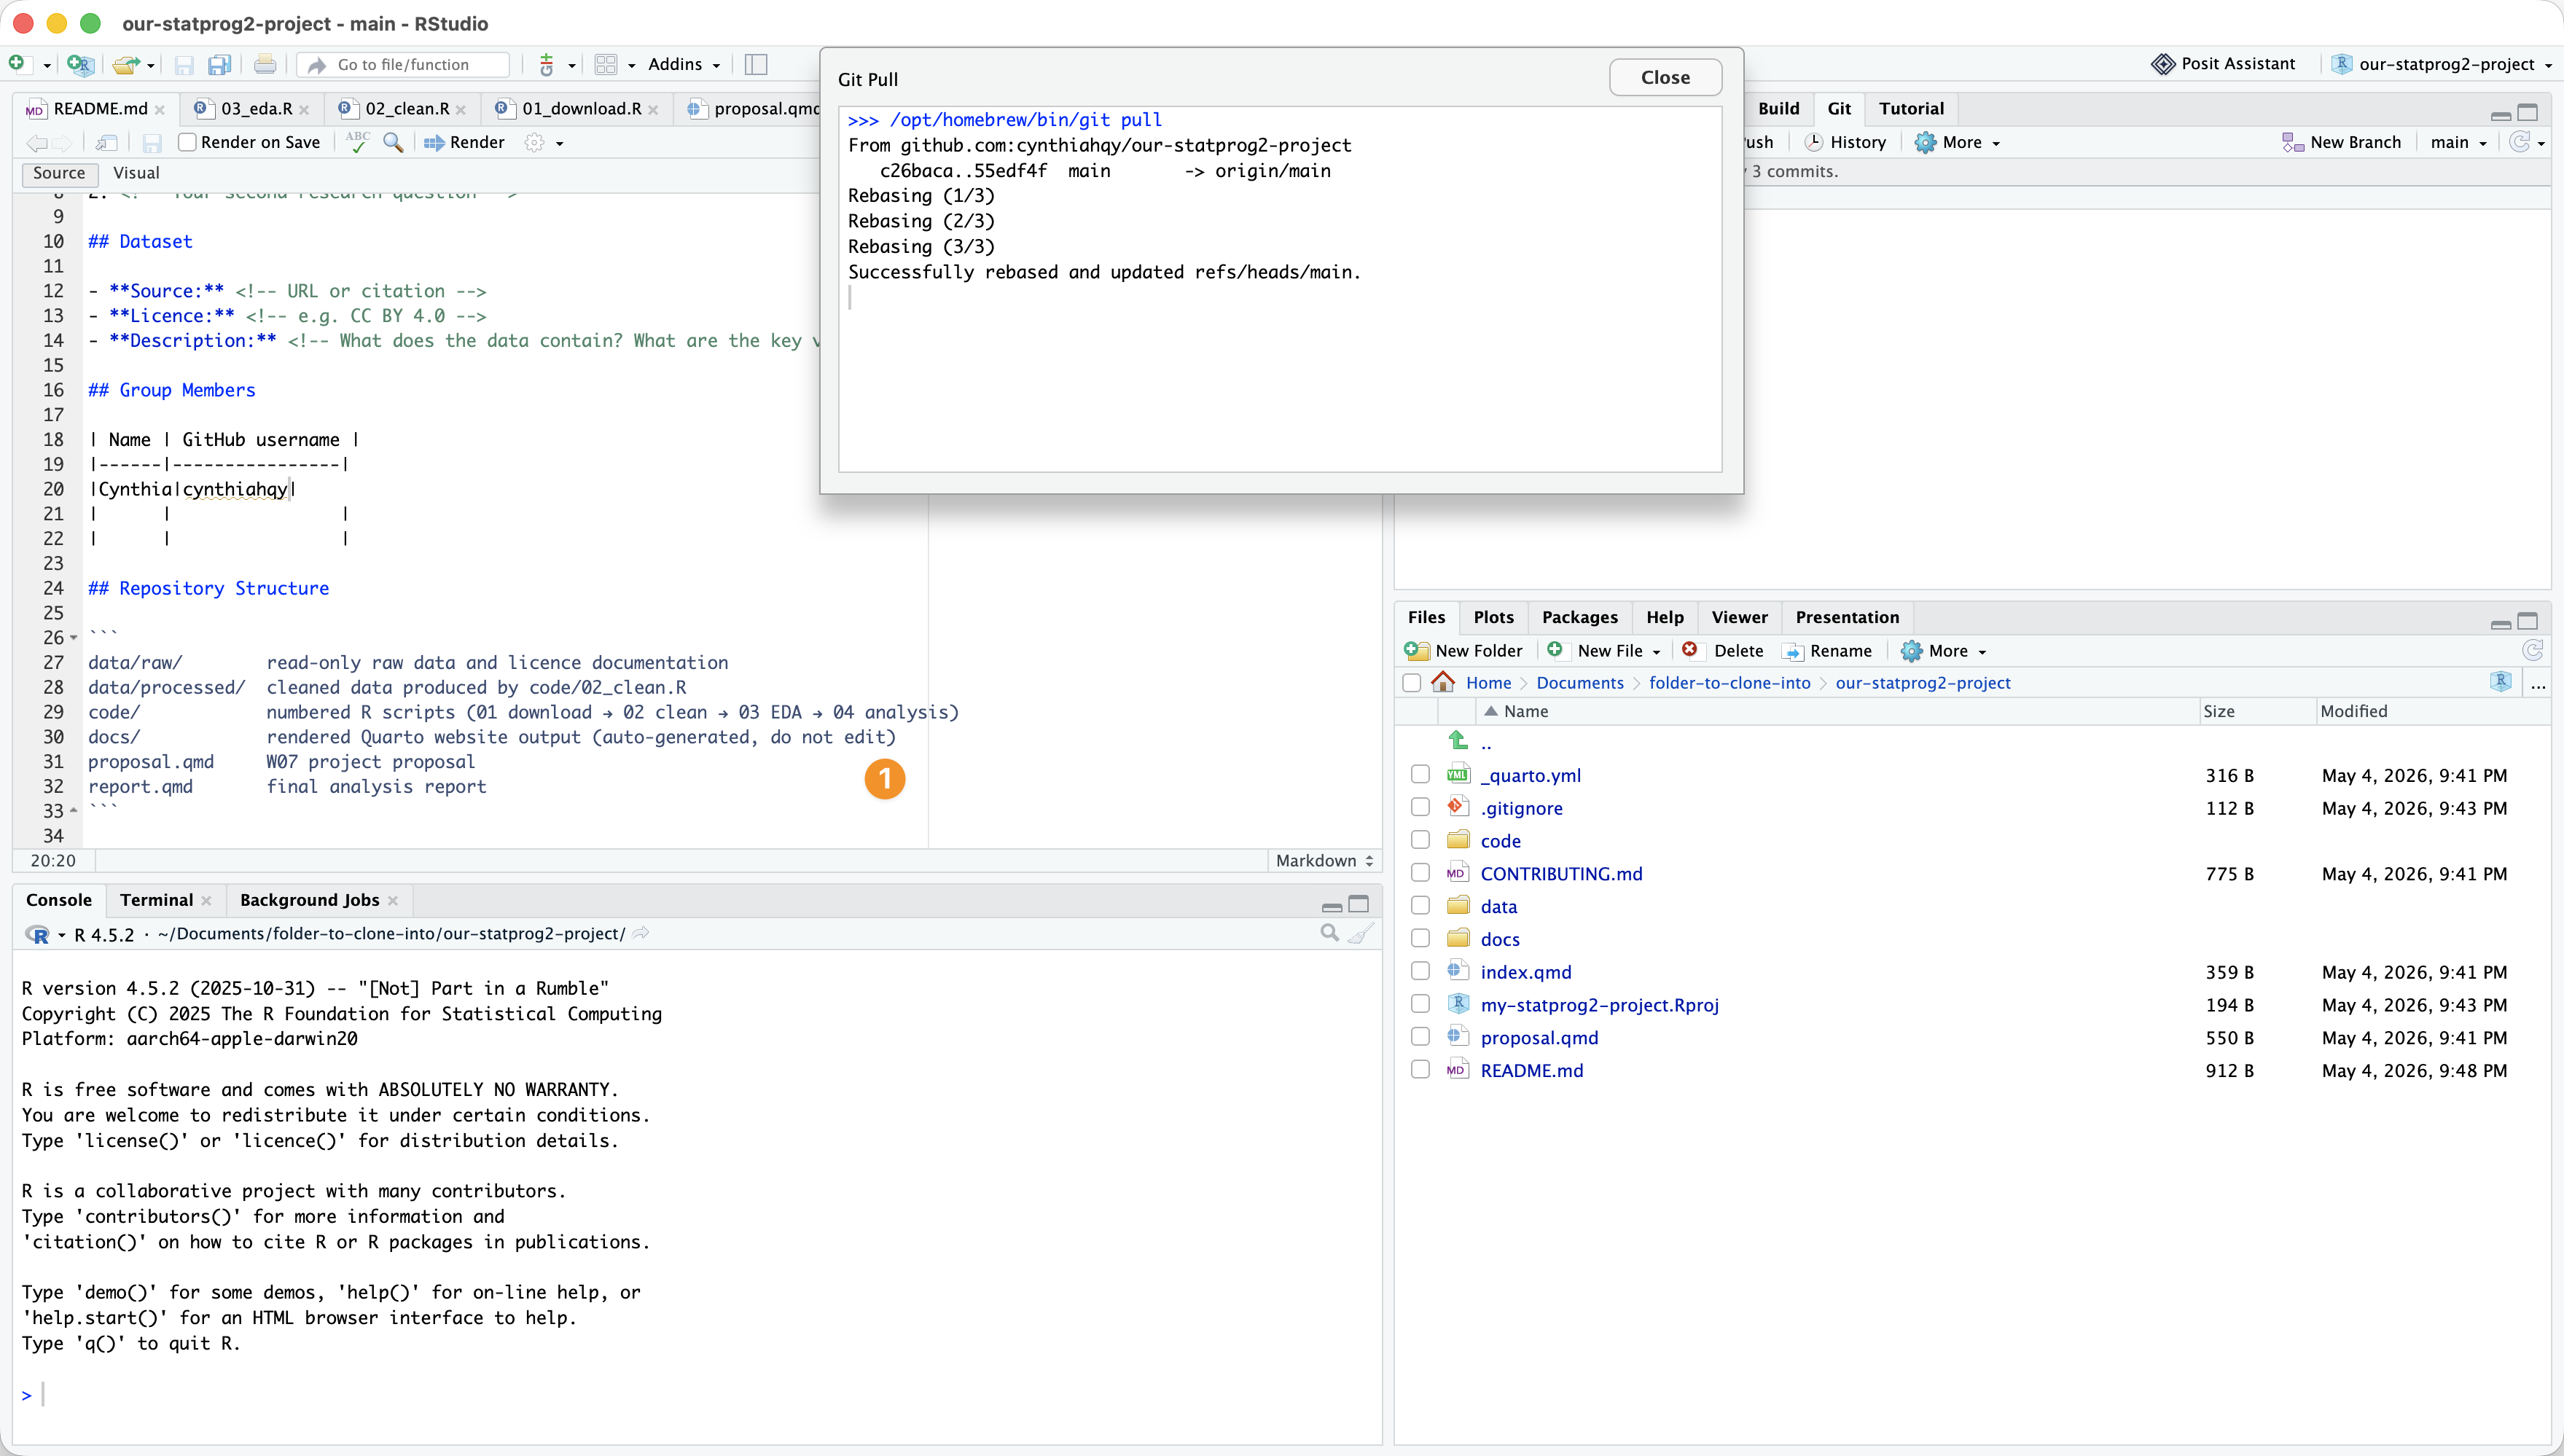
In RStudio: Pull THEN Push
In RStudio: Success!
Pushing an existing repository?

Let’s say you have a repository on your local machine, and you want to git push it to GitHub

You can’t push without a remote!
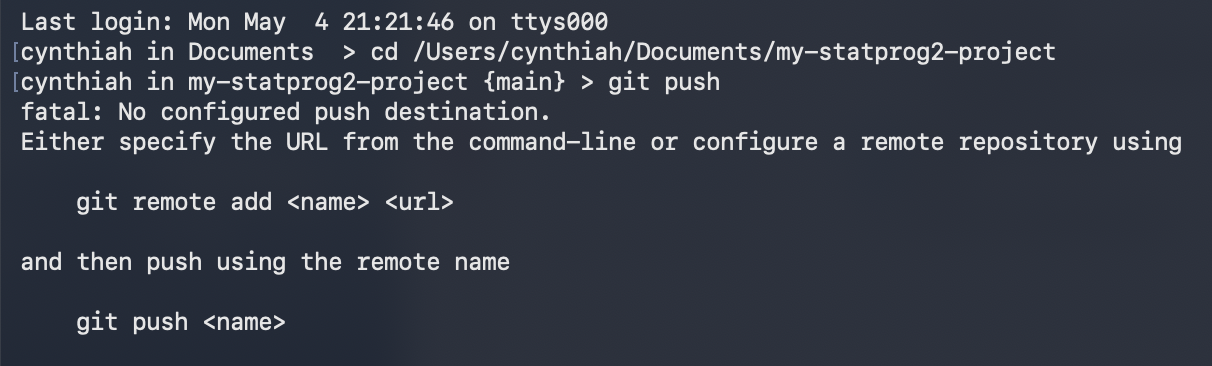
So we need to set up a remote repository to connect to!

GitHub: Creating a new repo
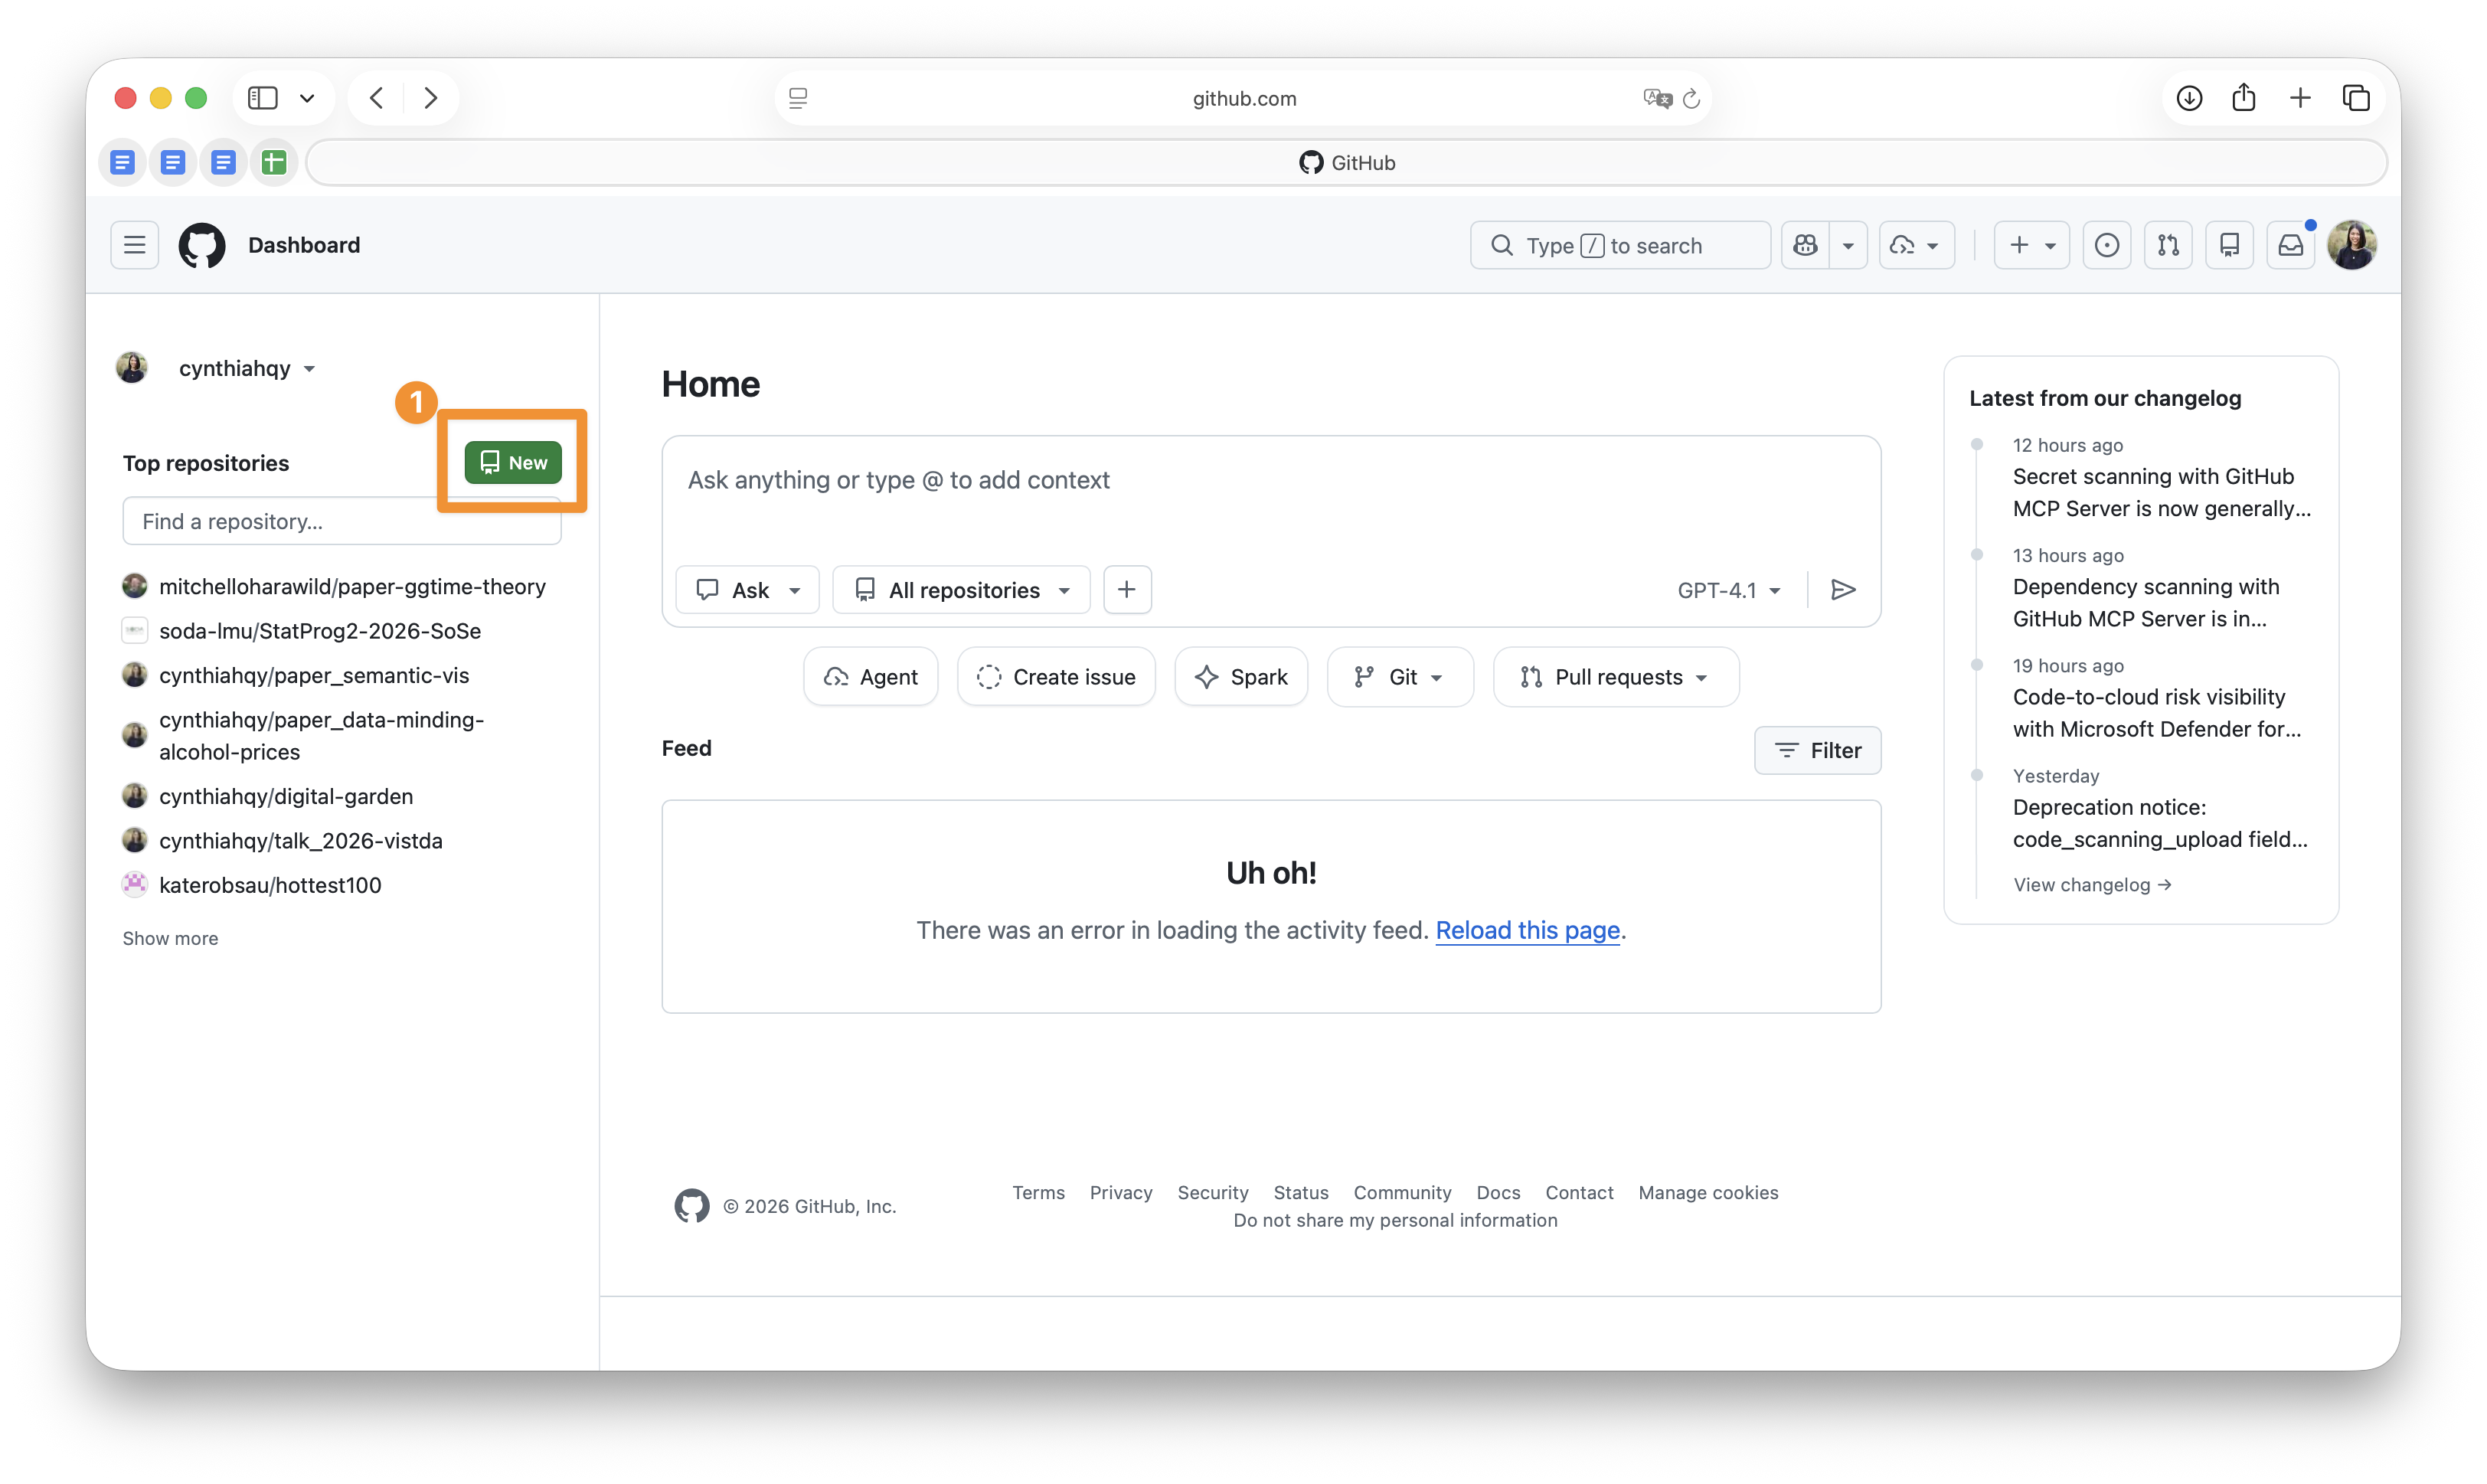
GitHub: Creating a new repo
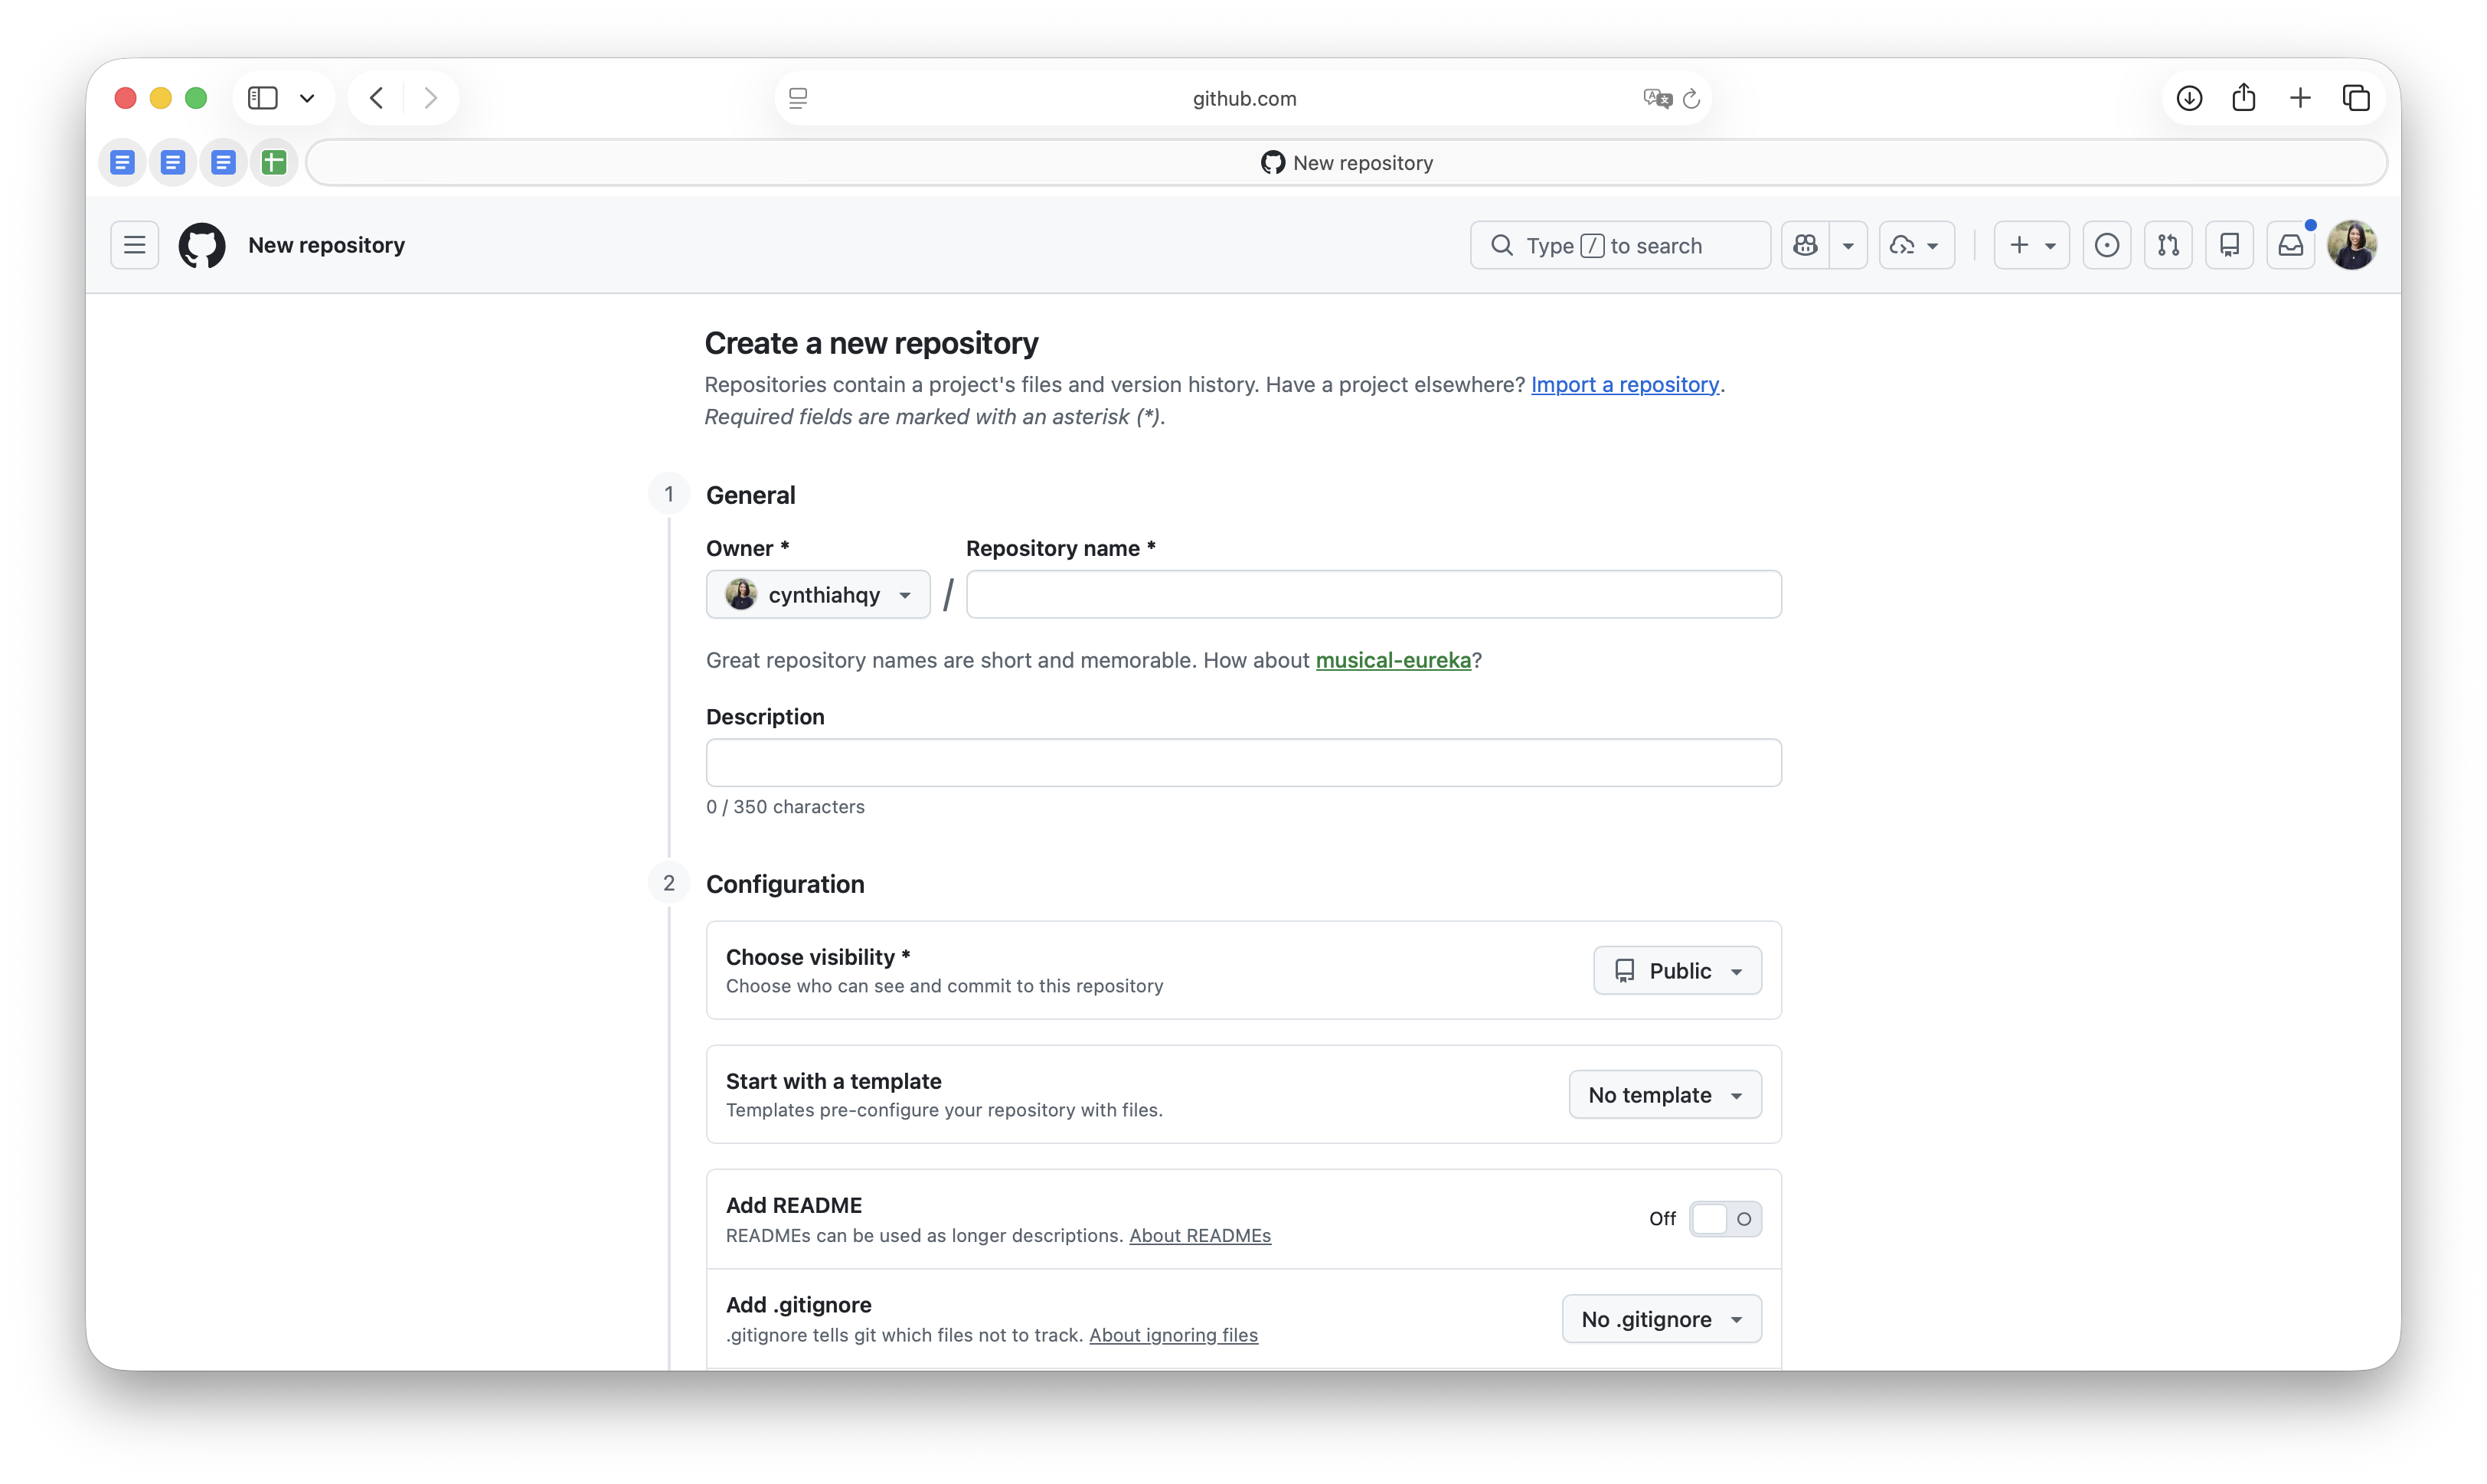
GitHub: Add remote

GitHub shows you exactly what to run after creating an empty repo:

git remote add origin <url>
git branch -M main
git push -u origin main

Tip

  • -u sets origin/main as the upstream — after this, plain git push works.
  • git remote -v confirms the connection — you should see origin pointing to your GitHub URL.

Extension: GitHub CLI

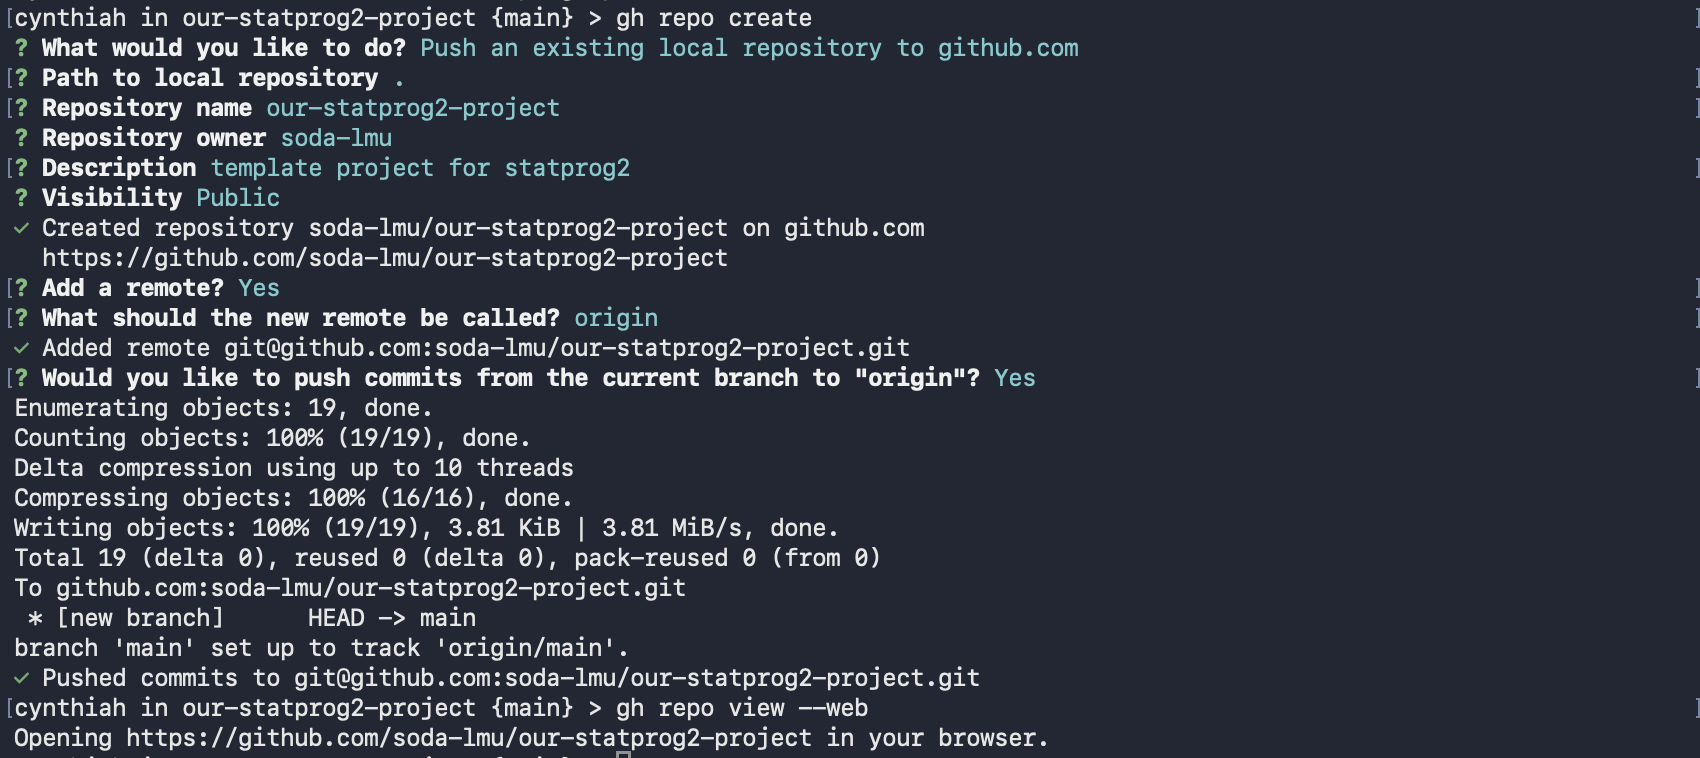
The GitHub CLI (gh) lets you create repos without leaving the terminal.
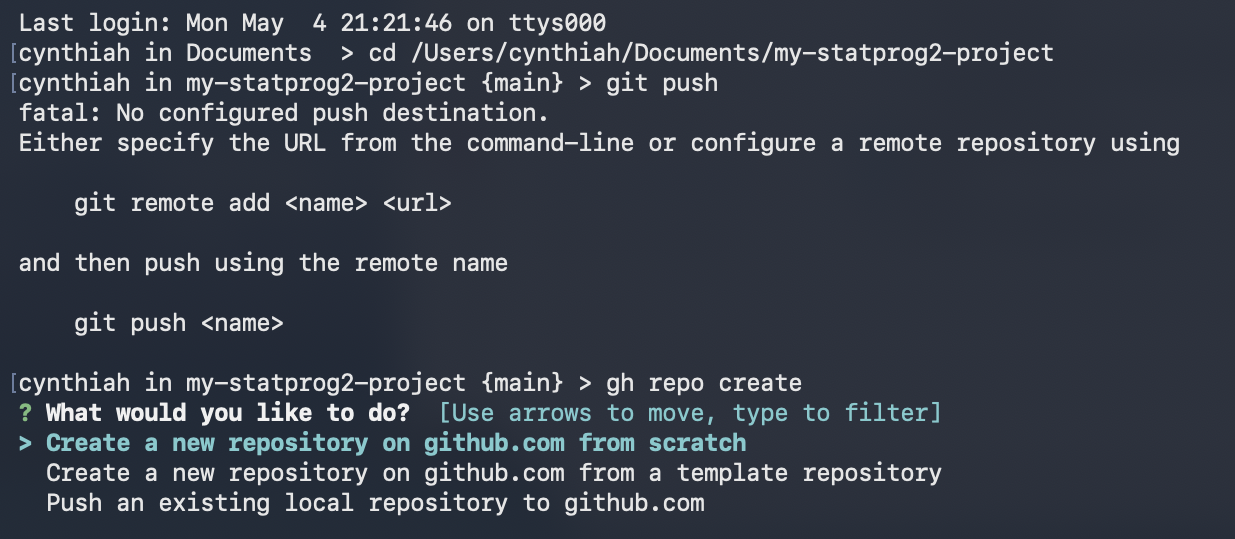
From inside an existing local repo:

gh repo create

Follow the interactive prompts to set the name, visibility, and whether to push immediately.

Extension: GitHub CLI

Summary

Git: local version control

  • init, add, commit — the core loop; each commit is a snapshot with a parent pointer
  • Good commit messages are imperative, one logical change at a time
  • Use RStudio’s History panel (or git log) to browse and restore past versions
  • Specify files you don’t want to track with .gitignore

GitHub: beyond local

If you already have a local repo

git remote add origin <url>
git branch -M main
git push -u origin main

-u sets origin/main as the upstream — after this, plain git push works.

If you’re starting fresh

git clone <url>      # creates local repo
                     # remote is already configured
cd my-project
# ... add files ...
git add .
git commit -m "First commit"
git push

Tip

git remote -v confirms the connection — you should see origin pointing to your GitHub URL.

Pull before you push!

  1. git pull — fetch and merge any remote changes first
  2. Resolve any conflicts if they arise
  3. git push — send your commits to GitHub

Tip

Make it a habit: pull first, then push. This avoids most “rejected push” errors.